WPDigiPro Plugin Documentation
Introduction
Thank you for purchasing WPDigiPro plugin. Before you get started, please be sure to always check out these documentation files. We outline all kinds of good information, and provide you with all the details you need know to use WPDigiPro Plugin.
If you are unable to find your answer here in the documentation, please contact us on our Support desk.
What is included in the price?
- WPDigiPro Plugin
- 1 Year Free Updates
- Plugin Documentation
- Premium Support - To our support desk.
Thanks!
WPDigiPro Team
Plugin Installation via WordPress
After the purchase you will be able to download the plugin .zip file.
Once downloaded, you should see wpdigipro.zip (zip file name can be changed from version to version).
Please, follow the steps below to install WPDigiPro Plugin.
Step 1 - Login to your WordPress Dashboard.
Step 2 - Go to Plugins. Click Add new button, located at the top of the screen. ( see screenshots below )
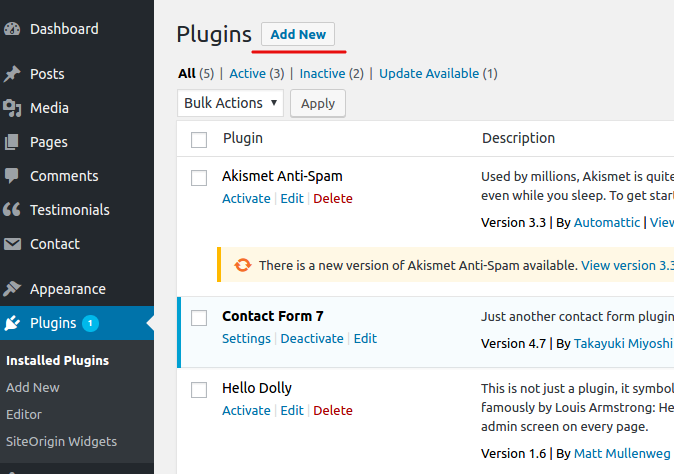
Step 3 - Click on Upload Plugin button at the top of the screen.
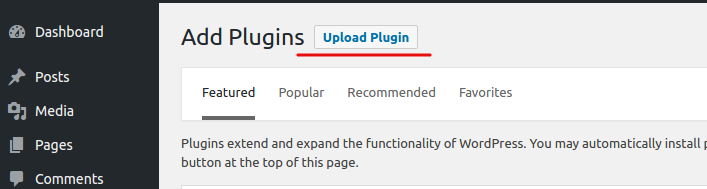
Step 4 - Choose wpdigipro.zip.
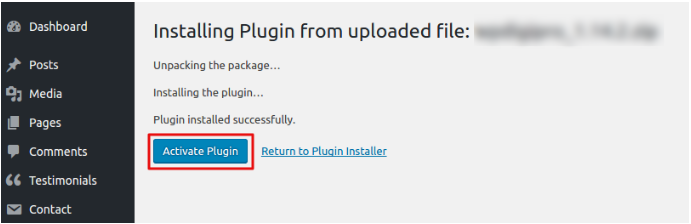
Step 5 - Wait while the plugin is uploaded and installed , when done Activate the WPDigiPro plugin.
Step 6 - Congratulation you are ready to use WPDigiPro plugin.
Common Plugin Installation Problems
“Are you sure you want to do this?”
If you get the “Are you sure you want to do this” message when installing wpdigipro.zip file via WordPress, it means you have an upload file size limit. Install the plugin via FTP if this happens, or ask your hosting company to increase the limit.
Missing stylesheet file
If you get an error saying that the stylesheet is missing, then you have uploaded the wrong folder. Please check that you are uploading the wpdigipro.zip within the Plugin Files folder.
Plugin Installation via FTP
If you are going to install the plugin using FTP, you will need an FTP Client, such as FileZilla.
After the purchase you will be able to download the plugin .zip file.
Once downloaded, you should see wpdigipro.zip (folder name can be changed from version to version).
Please, follow the steps below to install WPDigiPro plugin via FTP:
Step 1 - Log into your hosting space (server) via FTP client.
Step 2 - In extracted archive folder, find wpdigipro folder
Step 3 - Upload the wpdigipro folder to your server in path .../wp-content/plugins/
Step 4 - The uploaded path should be like this: .../wp-content/plugins/wpdigipro/

Step 5 - Login to your WordPress Dashboard and go to Plugins and activate the WPDigiPro Plugin. ( see screenshots below )
Step 6 - Congratulation you are ready to use WPDigiPro plugin.
Common Plugin Installation Problems
“Are you sure you want to do this?”
If you get the “Are you sure you want to do this” message when installing wpdigipro.zip file via WordPress, it means you have an upload file size limit. Install the plugin via FTP if this happens, or ask your hosting company to increase the limit.
Missing stylesheet file
If you get an error saying that the stylesheet is missing, then you have uploaded the wrong folder. Please check that you are uploading the wpdigipro.zip within the Plugin Files folder.
Additional Links
License Activation
After installing the plugin the first step to take will be activating the license. Enter the license key and you’ll get an access.
Follow the below instruction to activate the plugin license.
Note: All the other menu items will be visible, once the plugin license is successfully activated.
Go to your WordPress Dashboard > Appearance > WPDigiPro > License. Enter your license key and click on Active button.

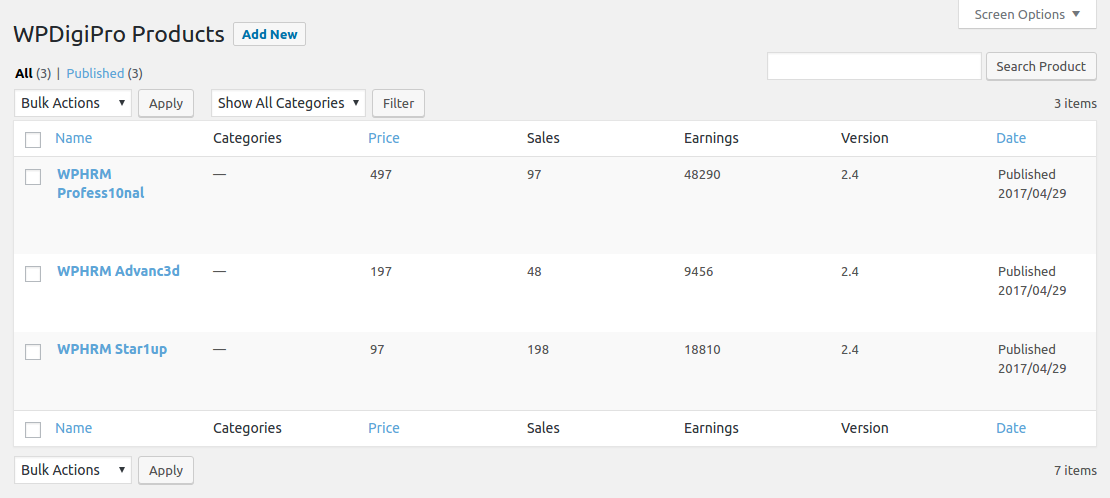
All Products
Under All products you’ll get a list of all the added products along with it’s price, total number of sales and generated revenue. Click on product name to edit the product.
Add New Product
Check the detailed guide on Add New product, if you are adding a product for the first time.
Note: In this guide we have installed all the Free & Paid addons for better understanding.
Go to WPDigiPro > Add New.
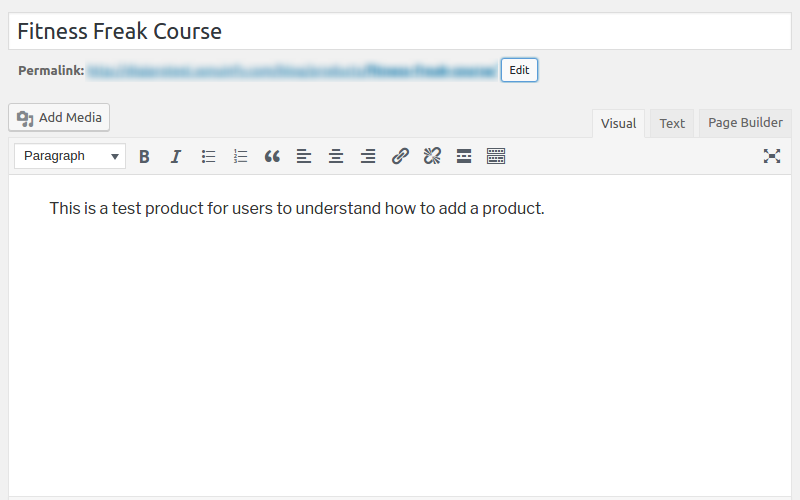
Create a Product
First add the product title and enter the relevant content in the editor. You can create an attractive pages using any page builders such as SiteOrigin, Visual Composer etc.
Product Settings:
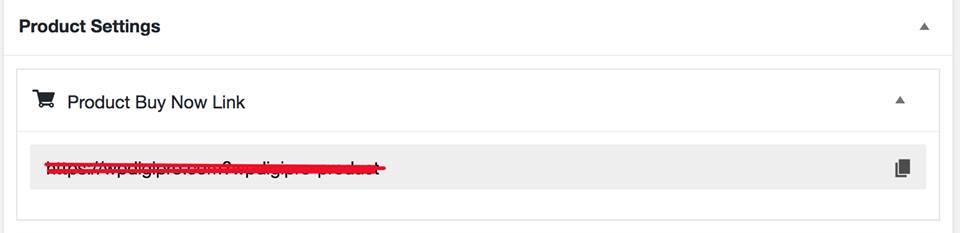
1. Product Buy Now Link
Click on copy button and place this buy now link on button or text. You can use this link anywhere across your website.

2. Price Settings
You can set the product price to One Time Payment, Recurring Payment, Adaptive Payment or Preapproved Payment from Price Option. Maintain the versioning using Version option.
Note: If you are selling a WordPress theme or plugin every time when you’ll change the version here, user will get an update notification on his WordPress dashboard.
Choose One Time Payment if you want the user to pay you one only.

For recurring payment select Recurring in Price Option. You can assign First Initial Price, Recurring period and other settings from here.
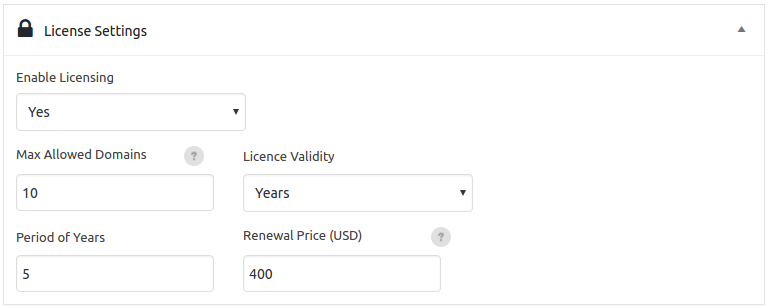
3. License Settings
Enable/Disable licensing from here. You can limit the installation on domains. This is a very useful feature for those who are selling WordPress based products. You can limit the license validity to days, months & years.
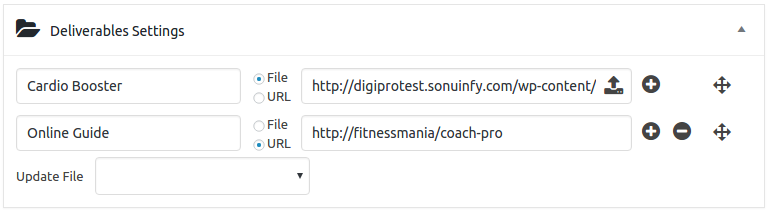
4. Deliverables Settings
All of your attachments will be uploaded here, which a user can download from his dashboard after purchasing a product. Here you can upload any file or assign a URL.
-- You can change the position of a file using Move button.
-- Unlimited files can be attached using Add button.
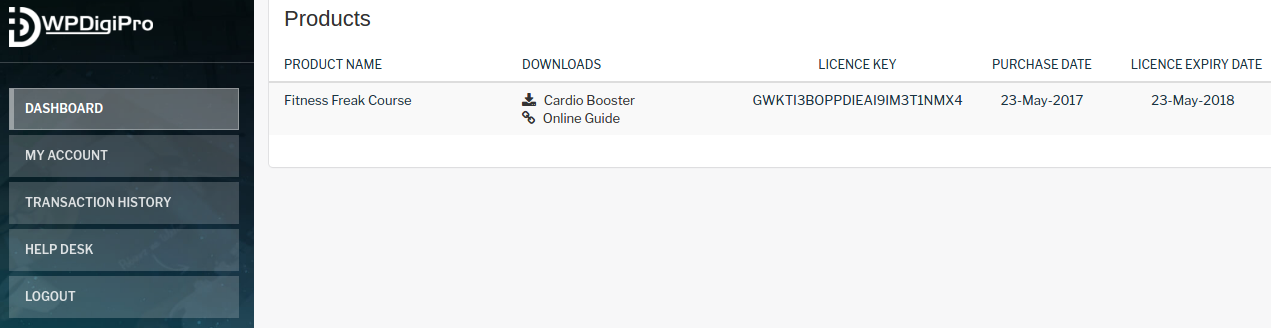
Dashboard View
Buyers can download the files from Dashboard as shown below.
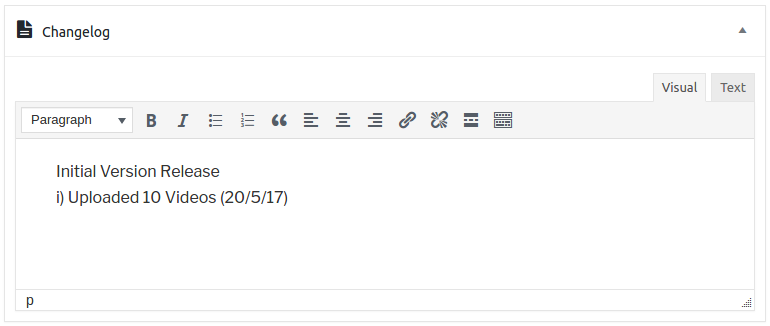
5. Changelog
Add your notes in Changelog every time you update your attachments and keep a track of changes made. If you are selling theme or plugin this changelog will be visible under Check for updates in Installed Plugins menu.
6. Facebook Track Code
In this section, you can add your facebook click tracking code to track the users clicks on perticular pruduct. Using this code you can track how many users can click on this product.

7. Redirect Settings
Set the redirect links after successful or failed payment. If you want to upsell and redirect your buyers to other OTO pages then these options will be very useful.
Note: You can have individual redirect links on every product page. Default redirect links can be set from settings area.

Order
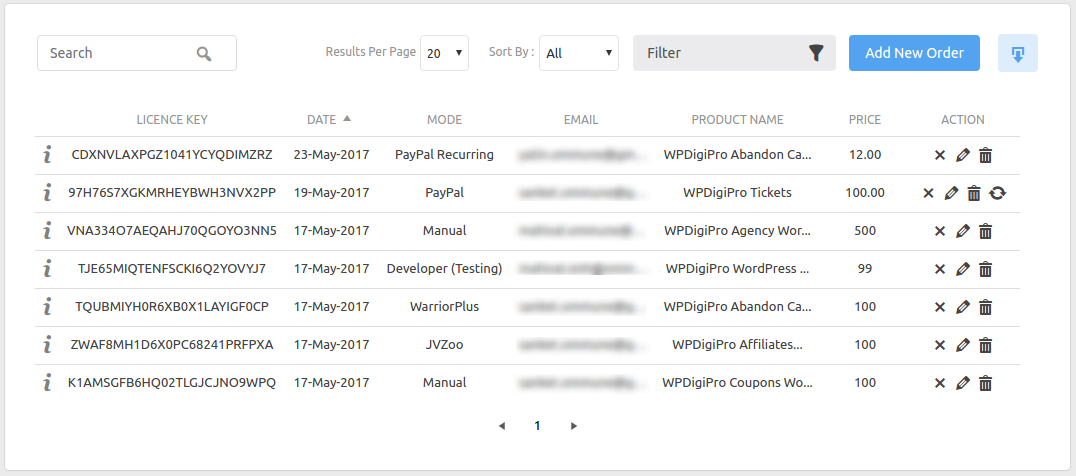
Here you’ll find the details of the orders placed. Hover on i icon to get more details of the buyer. You can perform search by product name, user name and license key. Using action column you can edit, deactivate and delete license keys. Create manual license key by clicking on Add New Order.
Note: You can directly process PayPal refunds from here using the refund icon in action column.
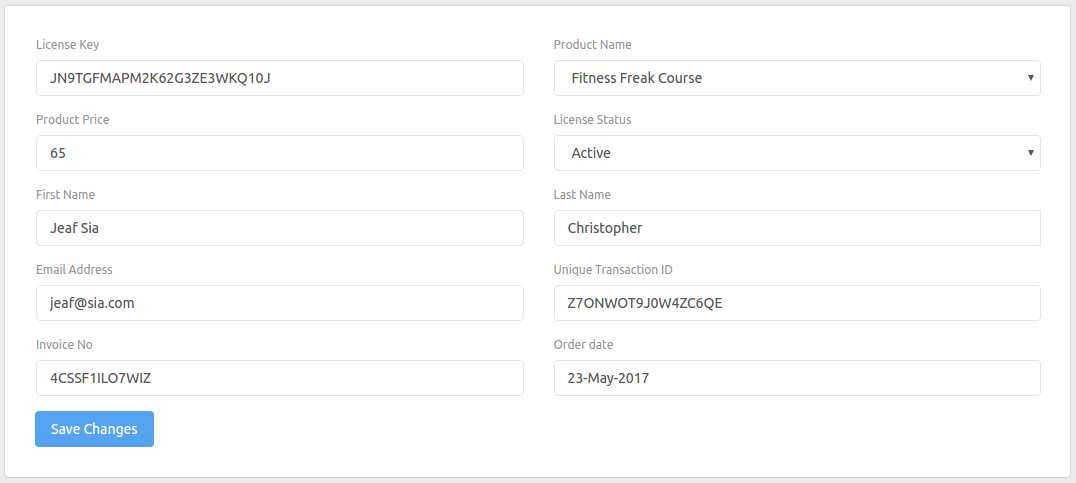
Add New Order
Select the product for which you are creating a manual license key and fill up rest of the details. Share license key with your buyer for them to give an access of a product.
Click Tracking
It allows you to track the total number of visitors on your website or on individual pages. You can create campaigns and add your investments, you can also track your ROI (Return On Investment).
Total Clicks : Shows total number of page visits, it includes page refresh too.
Unique Clicks : Shows the total number of IPs which has visited the website.
Investment: Click on the currency icon and add your expense, if you have paid for any adverts or campaigns.
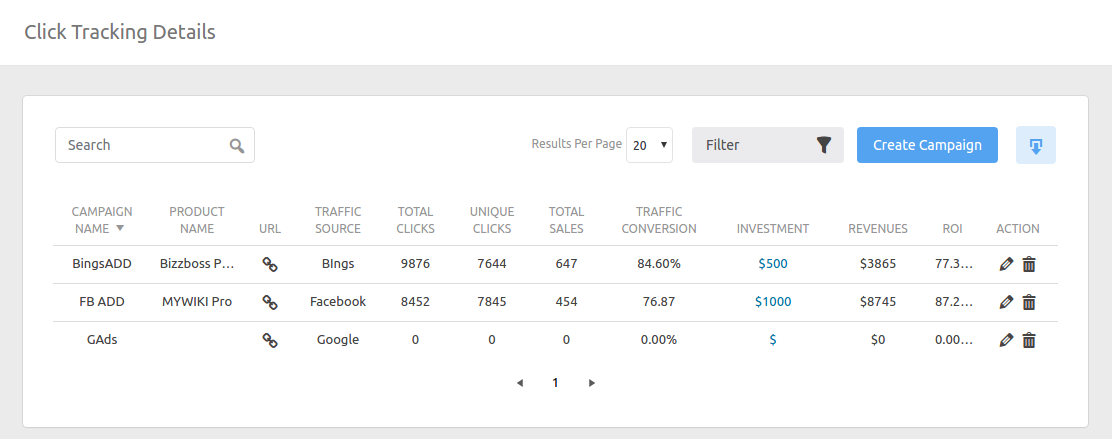
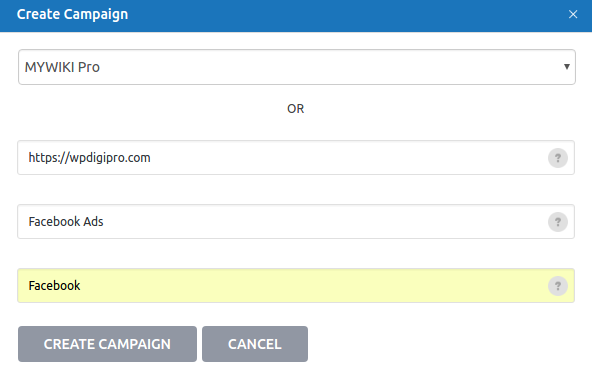
To create a new campaign click on Create Campaign. Either you can select from the products that you have created or you can add an external URL. Assign your campaign name and it’s source, when done click on Create Campaign button.
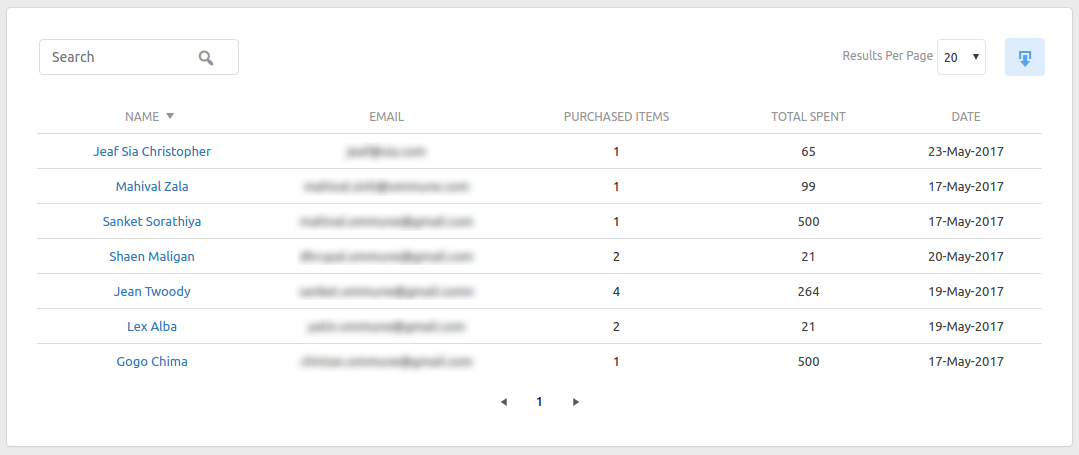
Customers
Buyers will be listed here along with their mail ids, total number of purchased items and total spent. Click on the buyer name to get detailed information on the products he/she has purchased. You can export your list of buyers in .csv format using export button.

Transactions
Here you can check the detailed list of all the transactions made. You can filter them according to the purchased products and same can be exported in .csv format
Reporting
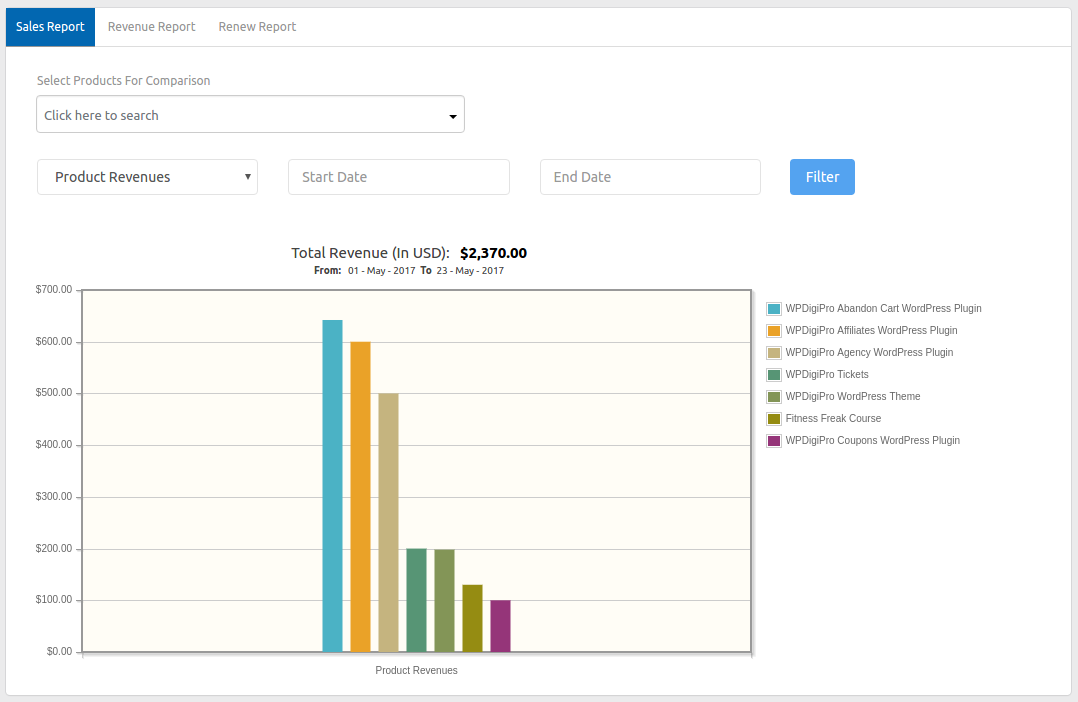
Sales Report:
Compare the products sales and the revenue generated. Select Products For Comparison option allows you to select multiple products using which you can compare the sales between multiple products. Search between days using Filter option and switching between Product Revenues to Product Sales is also provided.
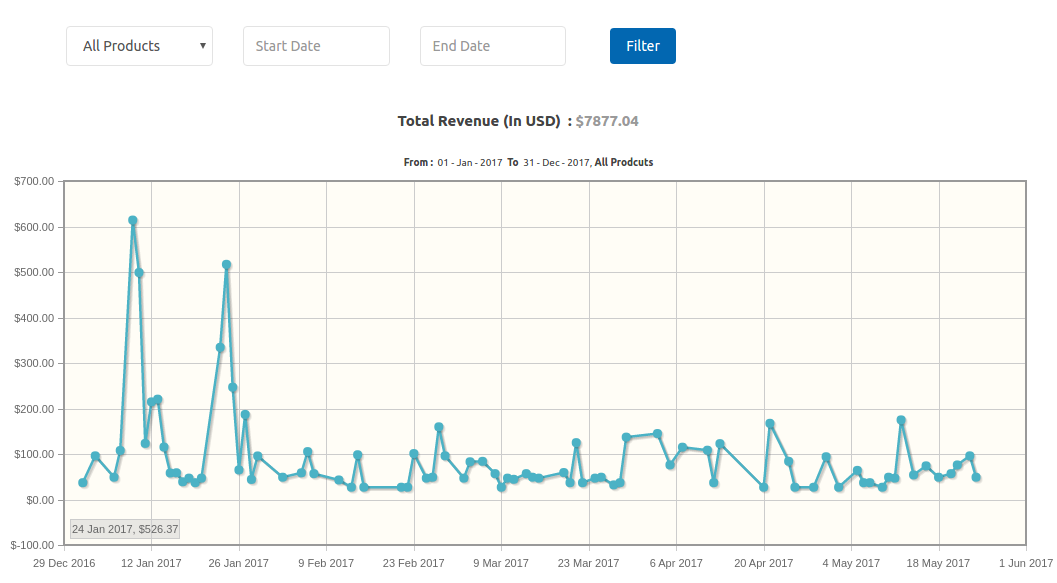
Revenue Report:
Check the daily generated revenue report in detail here.
Renew Report:
Likewise other reports, you can check the total revenue generated here via renewal. You can get the list of Buyers who has not renewed your product yet using Expired Licenses button.
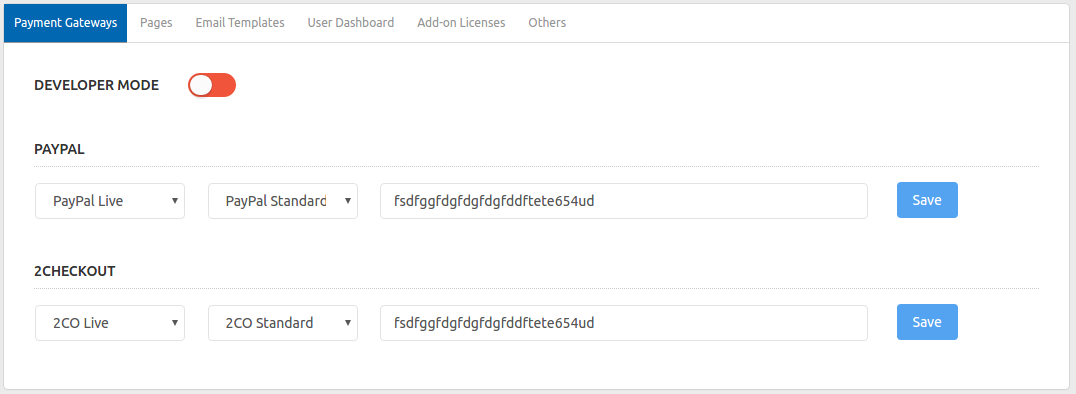
Payment Gateways
Developer Mode
If you want to perform a product purchase test. Switch the toggle and keep the developer mode on.
Note: Payment gateways will be disabled while the developer mode is on.

PayPal
1. Deactive – If you want to disable payment via PayPal.
2. PayPal Sandbox – Recommended for developers only.
3. PayPal Live – For normal usage.
2Checkout
1. Deactive – If you want to disable payment via 2Checkout.
2. 2CO Sandbox – Recommended for developers only.
3. 2CO Live – For normal usage.
To find the required parameters check our guide on How to find Parameters for Payment Gateways?
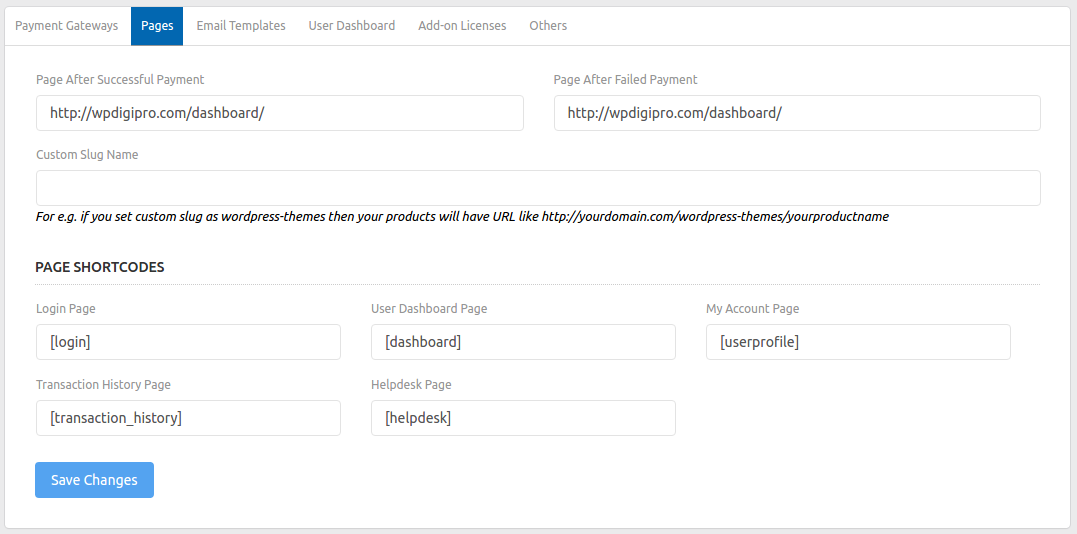
Pages
In this section, you can manage your success and failure payment redirect links. Also, you can add custom slug. In case if you want to use shortcodes they are listed under Page Shortcodes.
Note: You can set individual payment success and failure redirect links for the product. URLs assigned here will be considered as default redirect links.
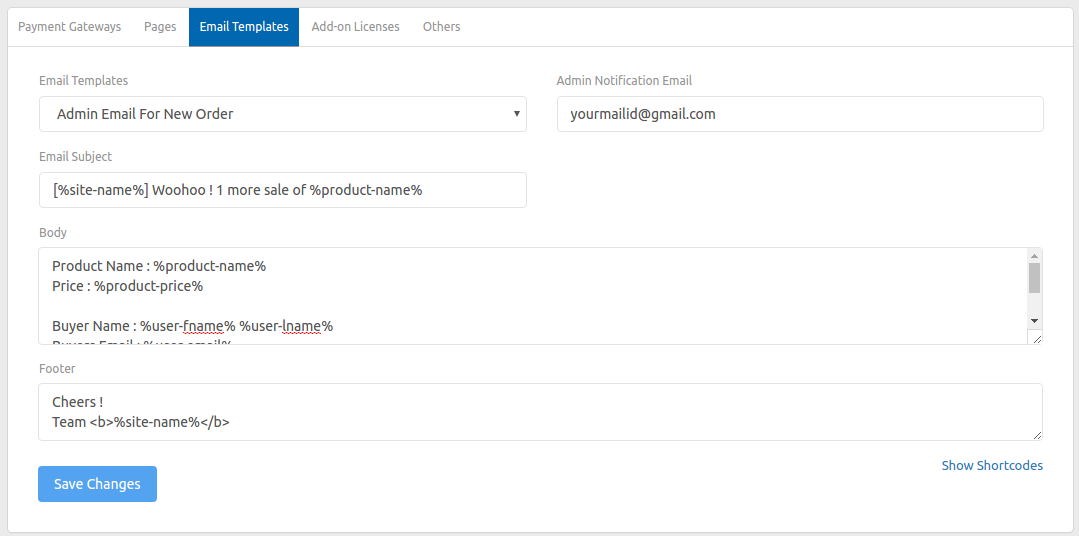
Email Templates
In this section, you can select your email template and then EDIT its content. We have provided some sample templates which you can access by clicking on Email Templates.
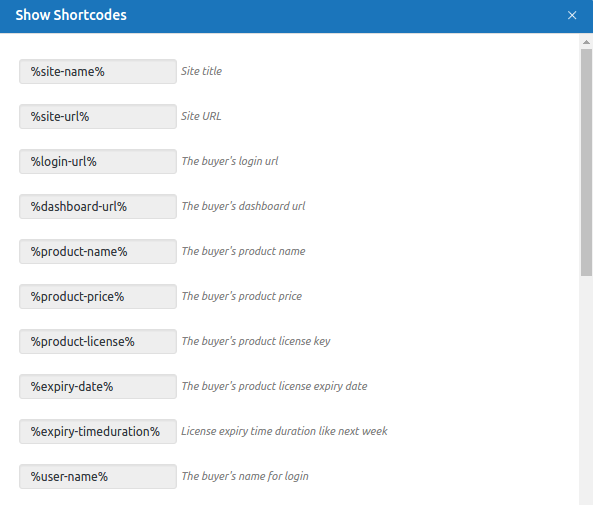
Click on ‘Show Shortcodes’ link which you see in the bottom right to check all the available shortcodes which you can use in your email templates.
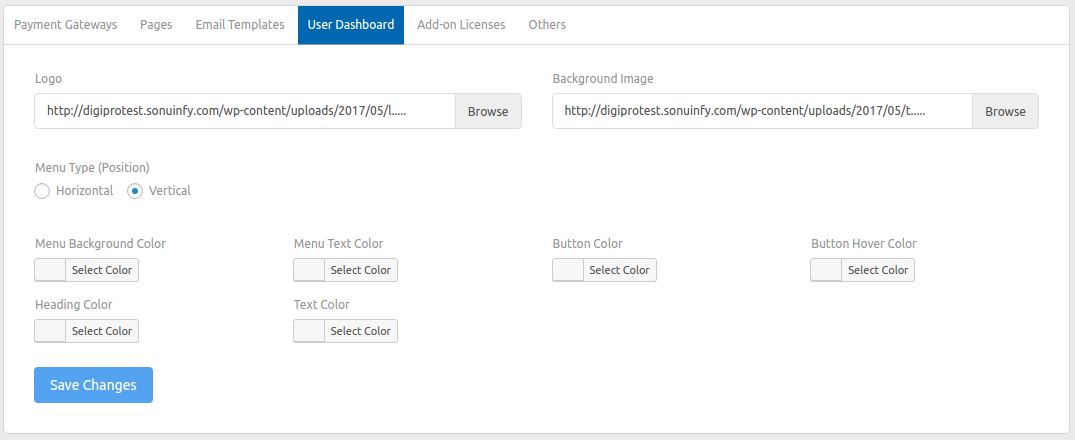
User Dashboard
In this section, you can change design elements of your user dashboard. You can upload the logo, background image. Change the position of user dashboard menu horizontally or vertically. You can customise the colours of menu background, text, button etc.
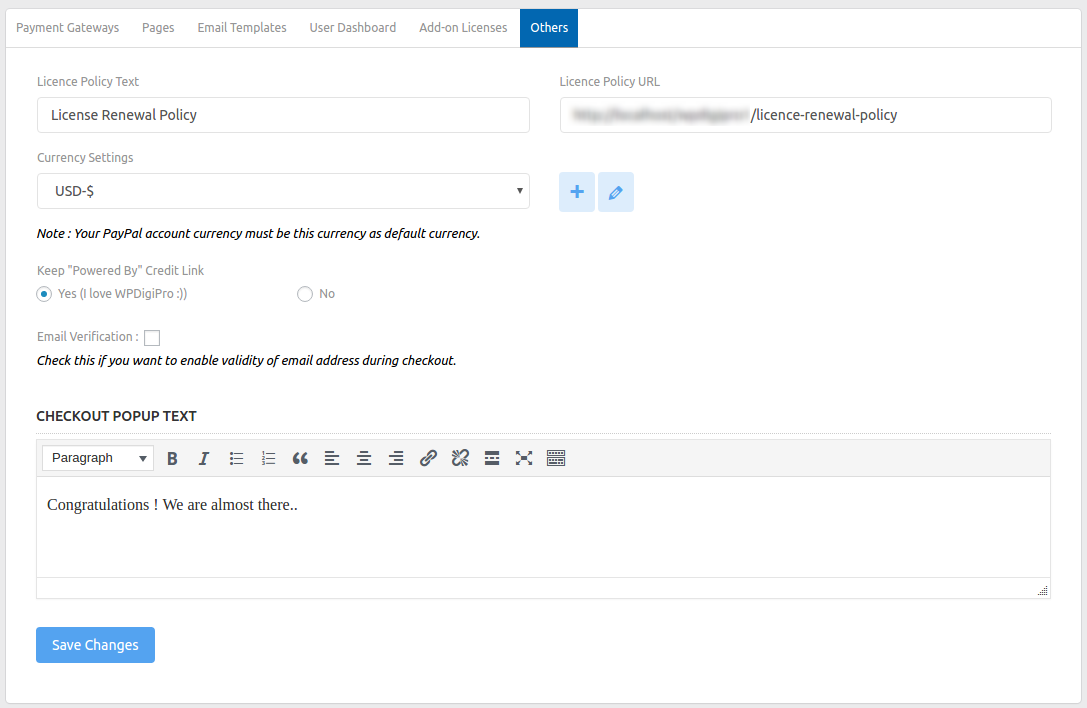
Others
Here you can assign licence policy URL along with the text that you want to keep. If your currency is not in the list, then click on add (+) button and add a custom currency.
Just in case if you want to remove the credit link you can disable it from here. Checkout popup text can be edited too.
Check Email Verification box, if you want a facility where user can not enter fake email ids at the time of final checkout.
MailerLite
If you don't have an account, you can create your MailerLite account using this link.
To create the API key, just go here: : https://app.mailerlite.com/integrations/api/. You will see a box that will have your API Key. Just click on "Copy" or "Regenerate" button. That's it.
Please check the below screenshot for more clarity:

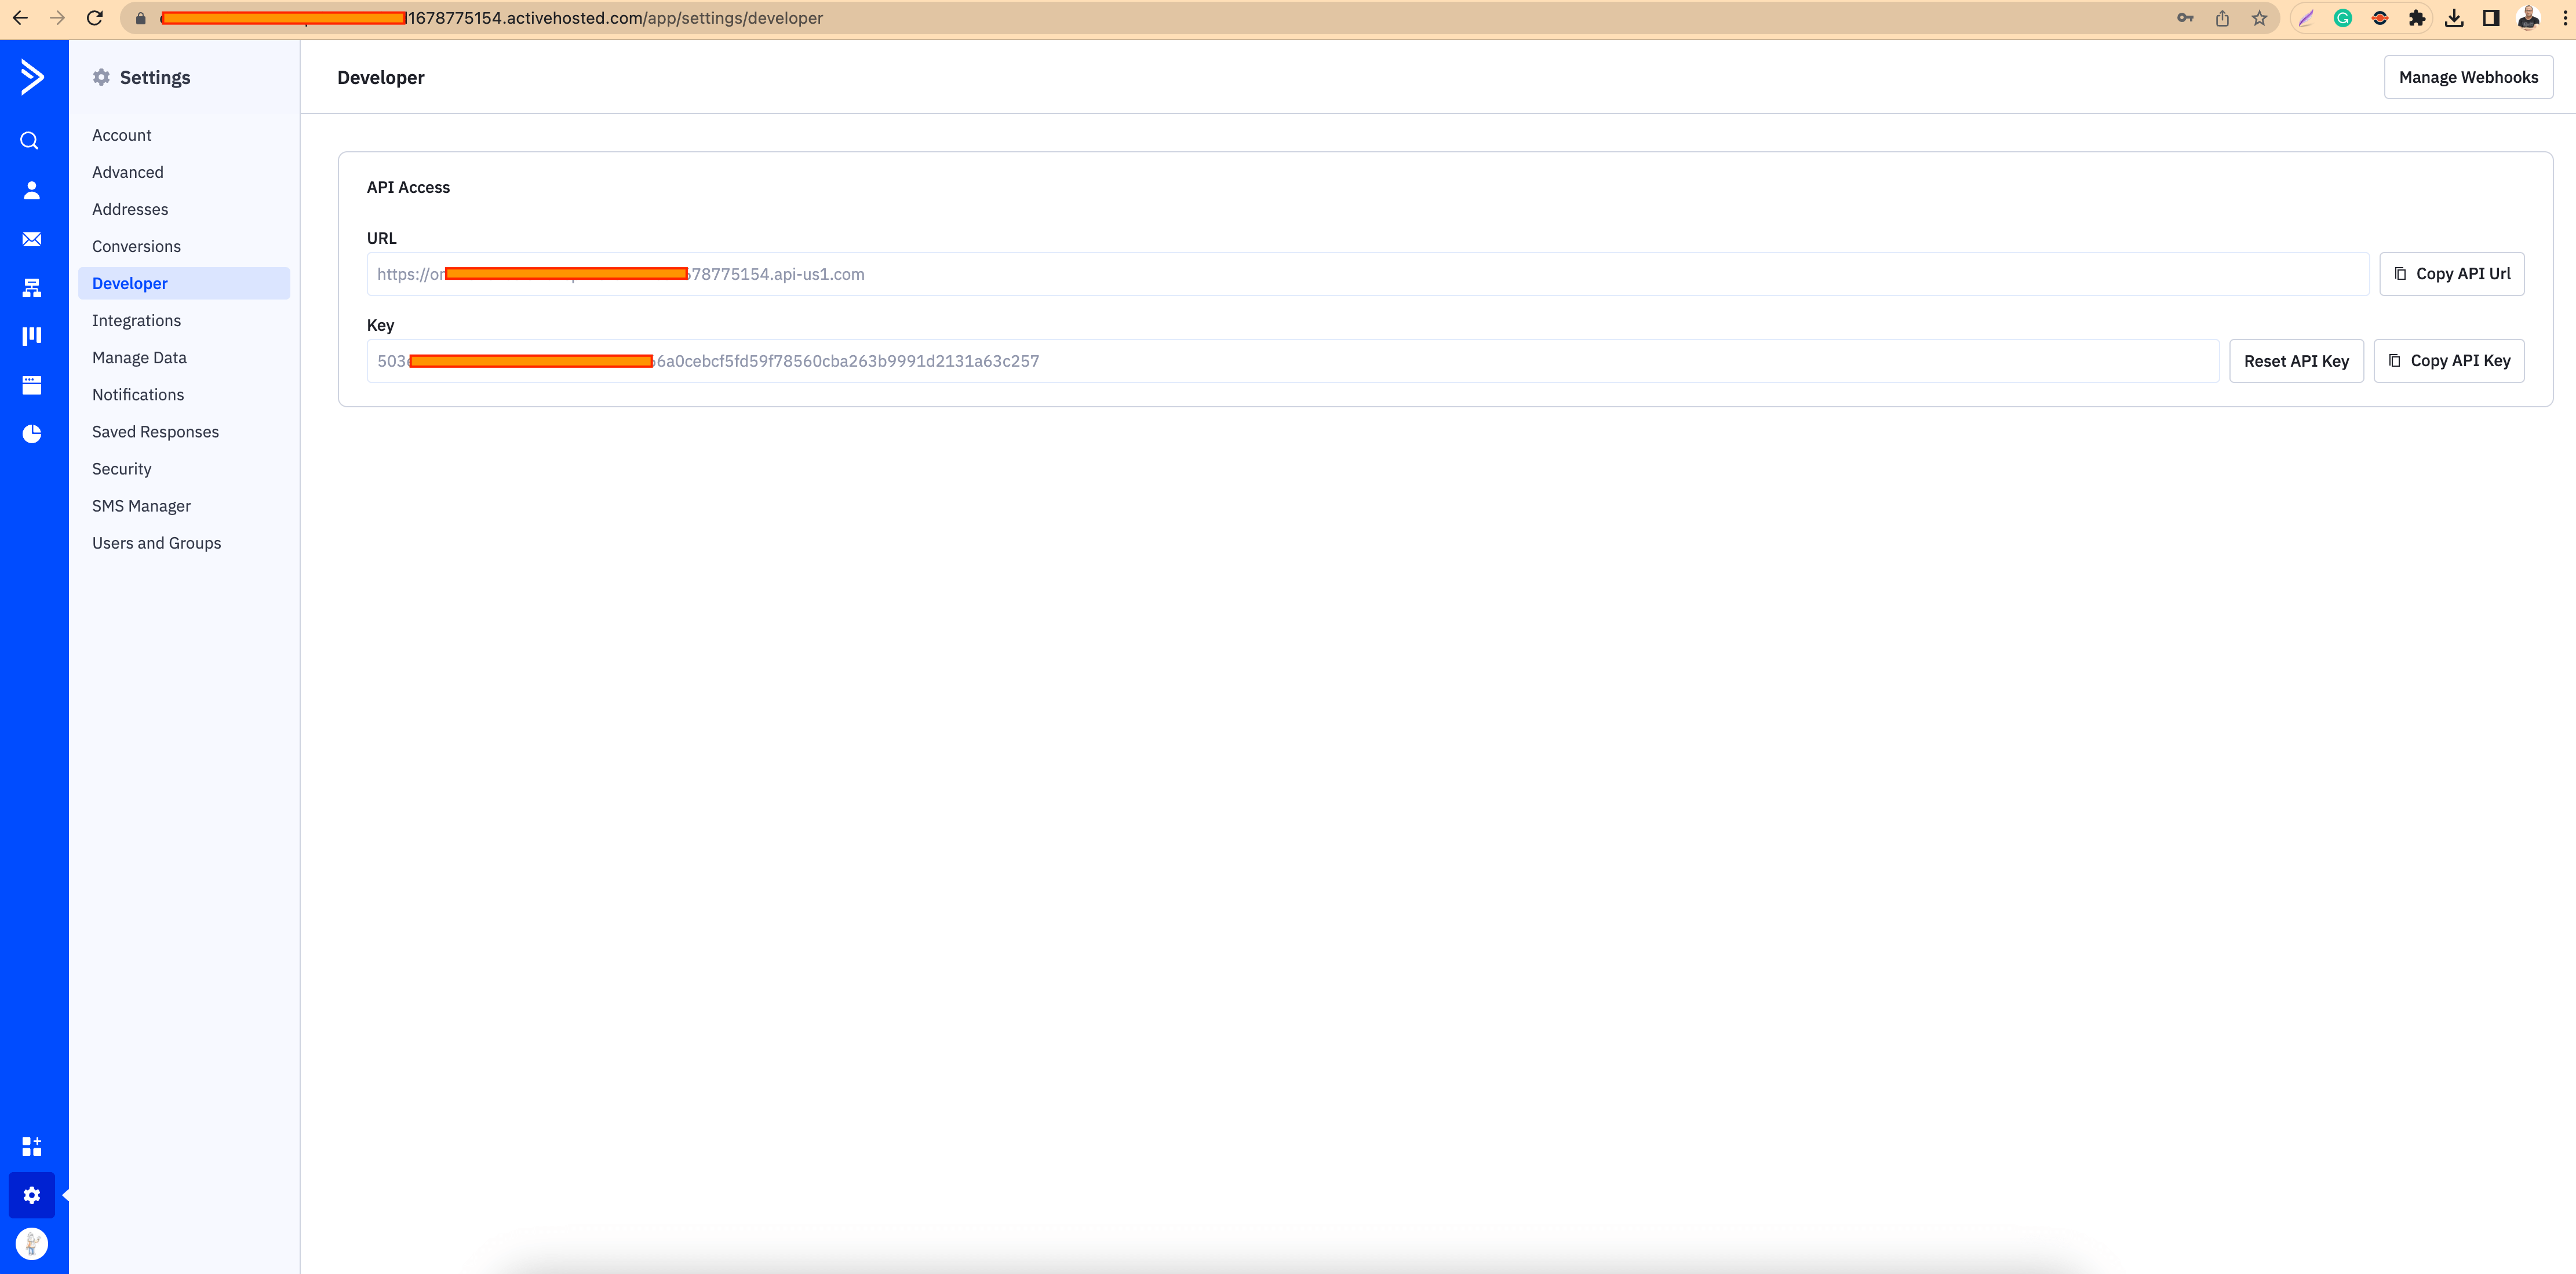
ActiveCampaign
If you don't have an account, you can create your ActiveCampaign account using this link.
You will get a seperate login URL to your dashboard as: https://yourcustomname.activehosted.com. You need to login there and then you need to go to https://yourcustomname.activehosted.com/app/settings/developer to get your "URL" and "Key" for API Access.
Please check the below screenshot for more clarity:
Sendlane
If you don't have an account, you can create your Sendlane account.
To create the API key (Sendlane API V2), just go here: : https://app.sendlane.com/api and click on "API Token" button. That's it.
Please check the below screenshot for more clarity:

Mailchimp
If you don't have an account, you can create your Mailchimp account.
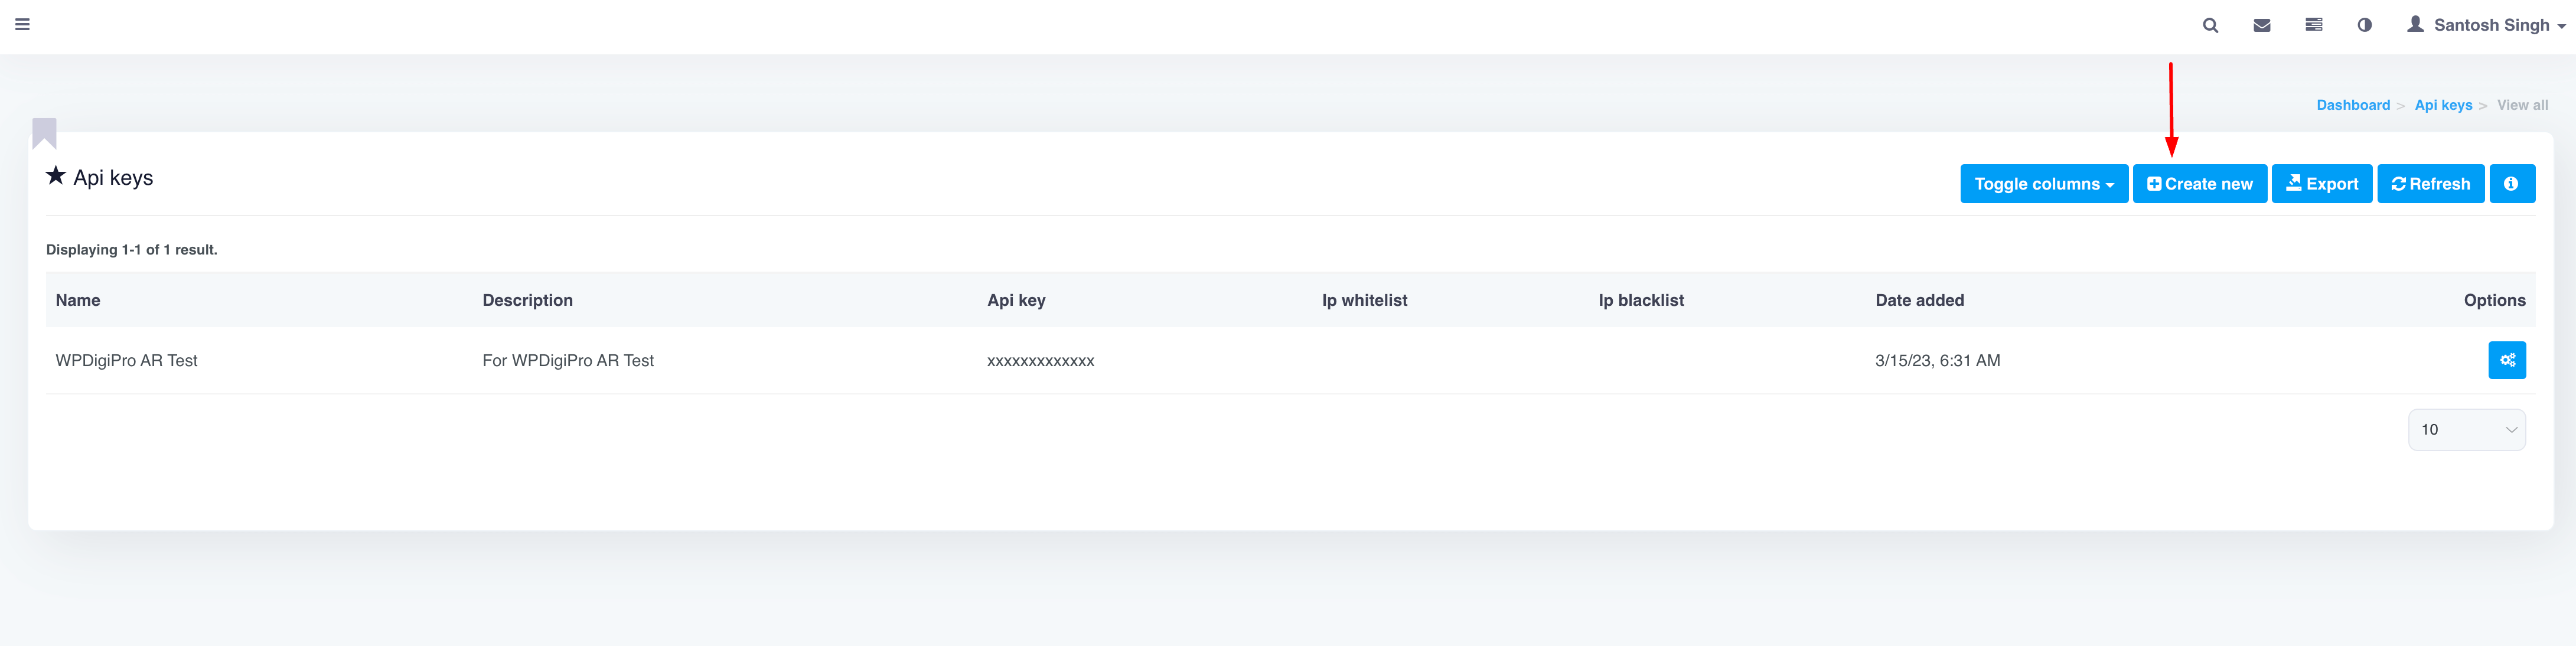
To generate an API key, follow these steps.
1. Navigate to the API Keys section of your account.
2. Click Create New Key.
3. Name your key descriptively, so you know what application uses that key. Keep in mind that you’ll see only this name and the first 4 digits on your list of API keys after the key is generated.
4. Click Generate Key.
5. Once we generate your key, click Copy Key to Clipboard. Save your key someplace secure; you won’t be able to see or copy it again. If you lose this key, you’ll need to generate a new key and update any integration that uses it..
6. Click Done.
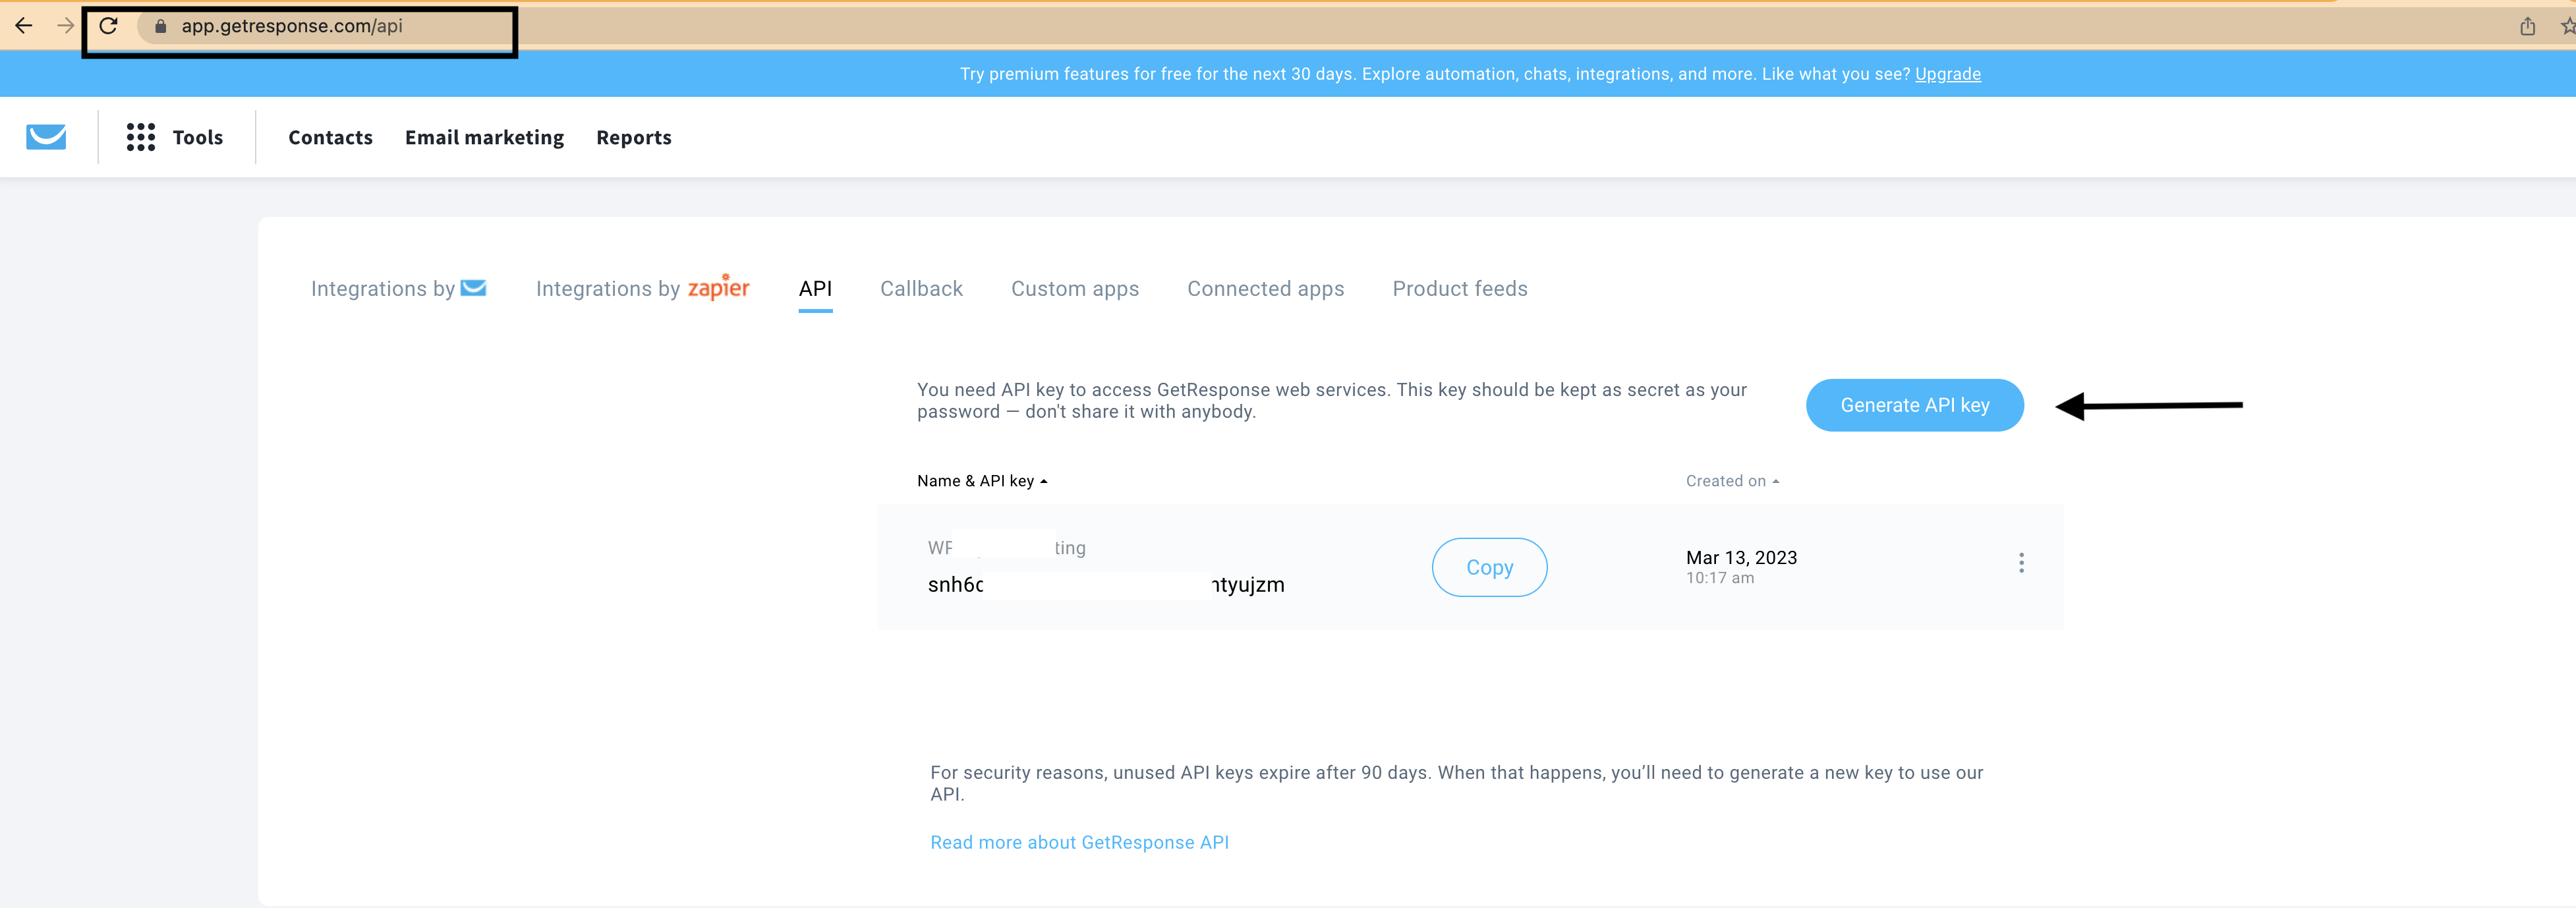
Getresponse
If you don't have an account, you can create your Getresponse account using this link.
To create the API key, just go here: : https://app.getresponse.com/api and click on "Generate API Key" button. That's it.
Please check the below screenshot for more clarity:
Campaign Monitor
If you don't have an account, you can create your Campaign Monitor account using this link.
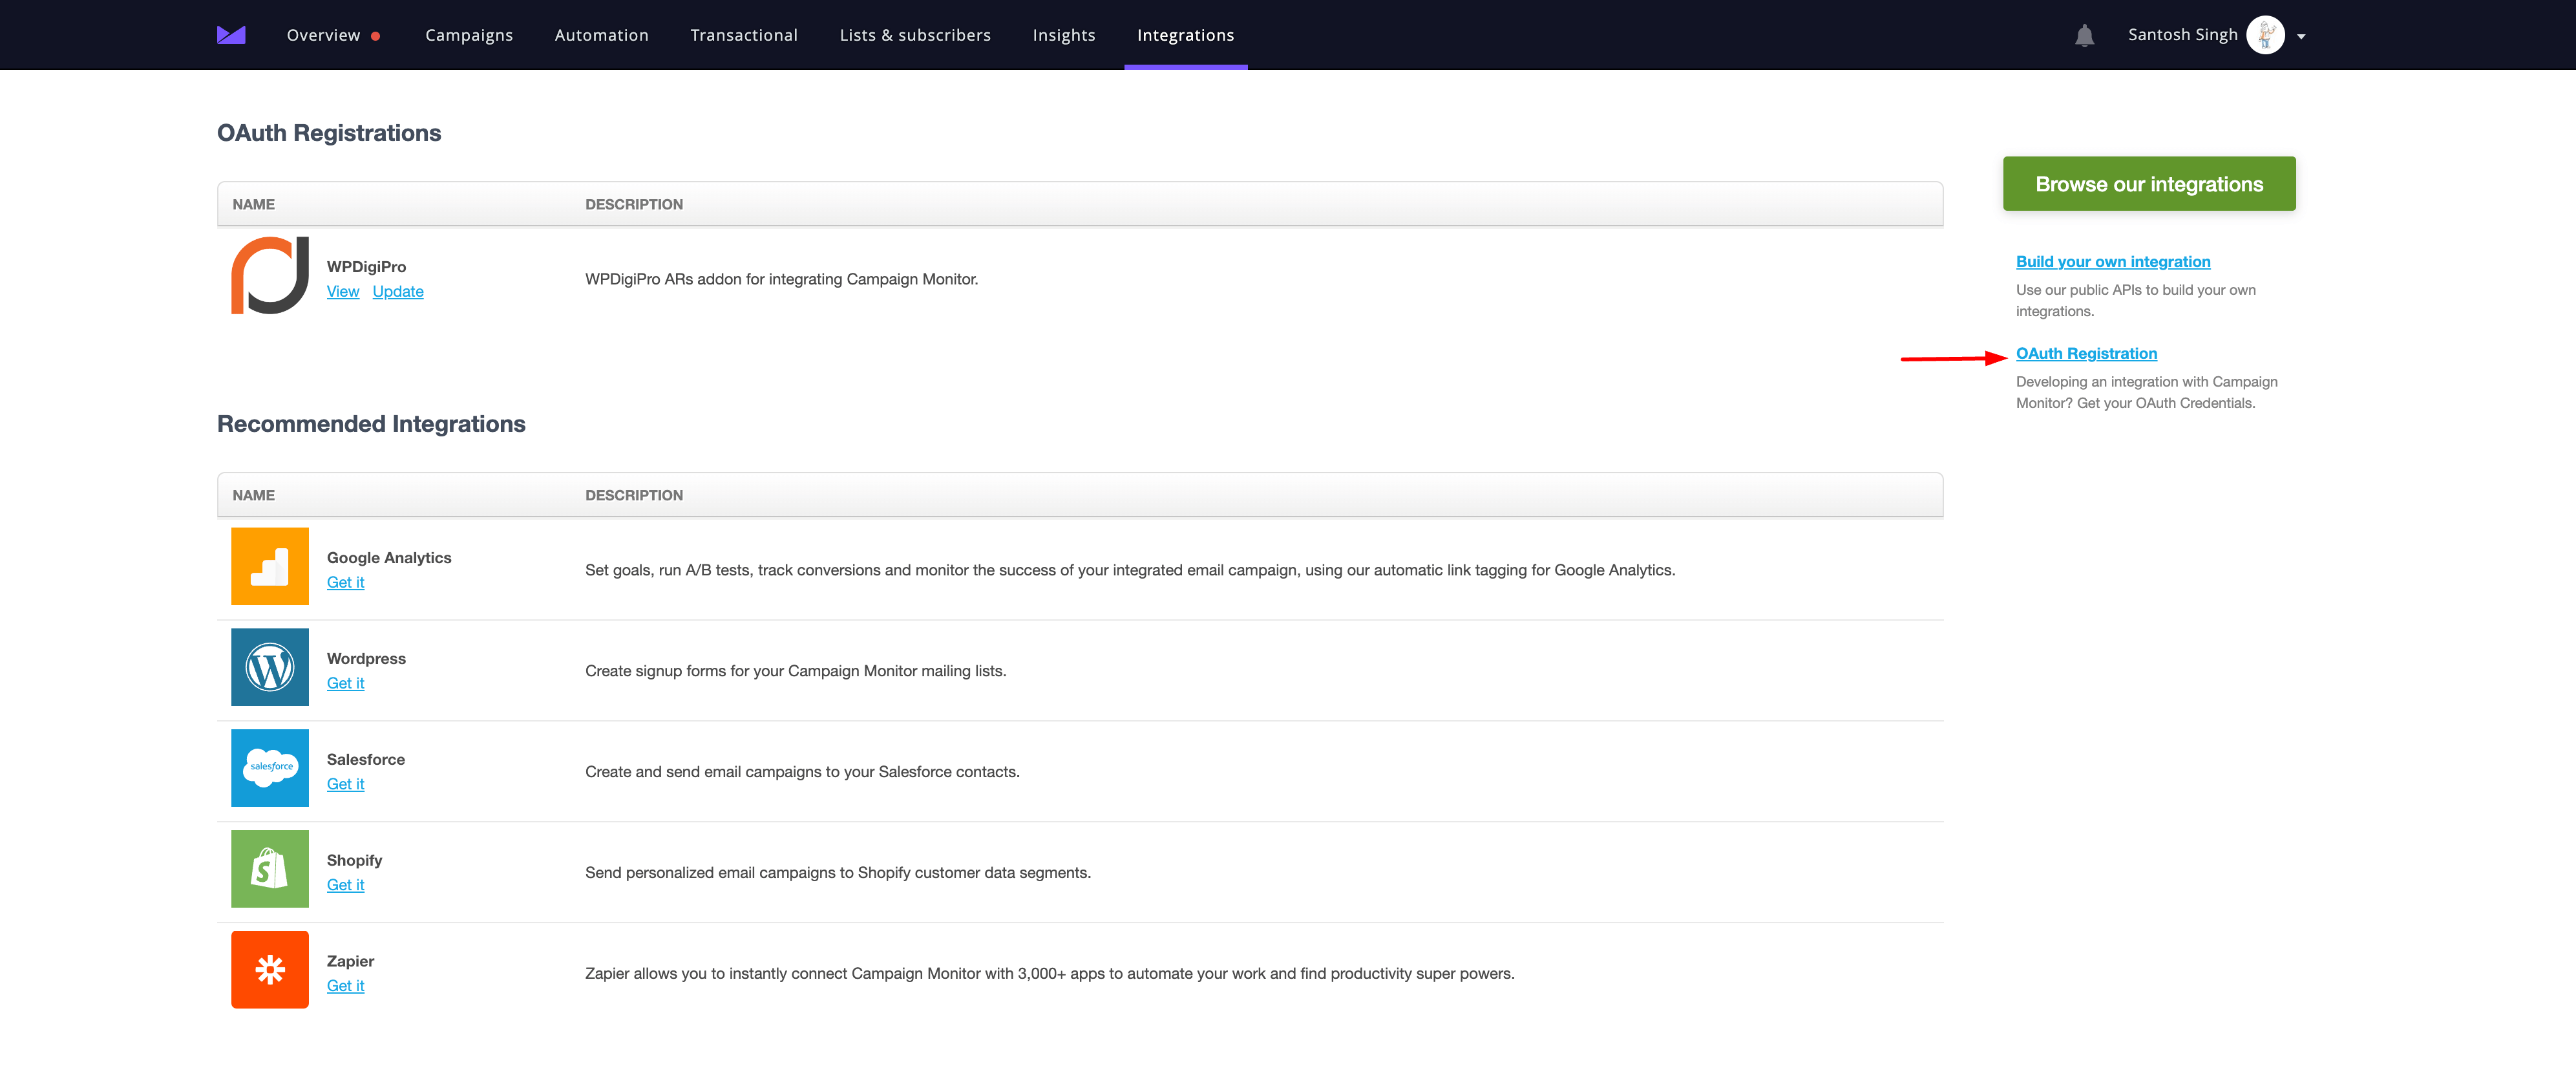
You will get a seperate login URL to your dashboard as: https://yourcustomname.createsend.com. You need to login there and then you need to go to https://yourcustomname.createsend.com/integrations/#/ or go to right hand side of the page where your name is appearing and then click on "Integrations" link in the menu as shown below:
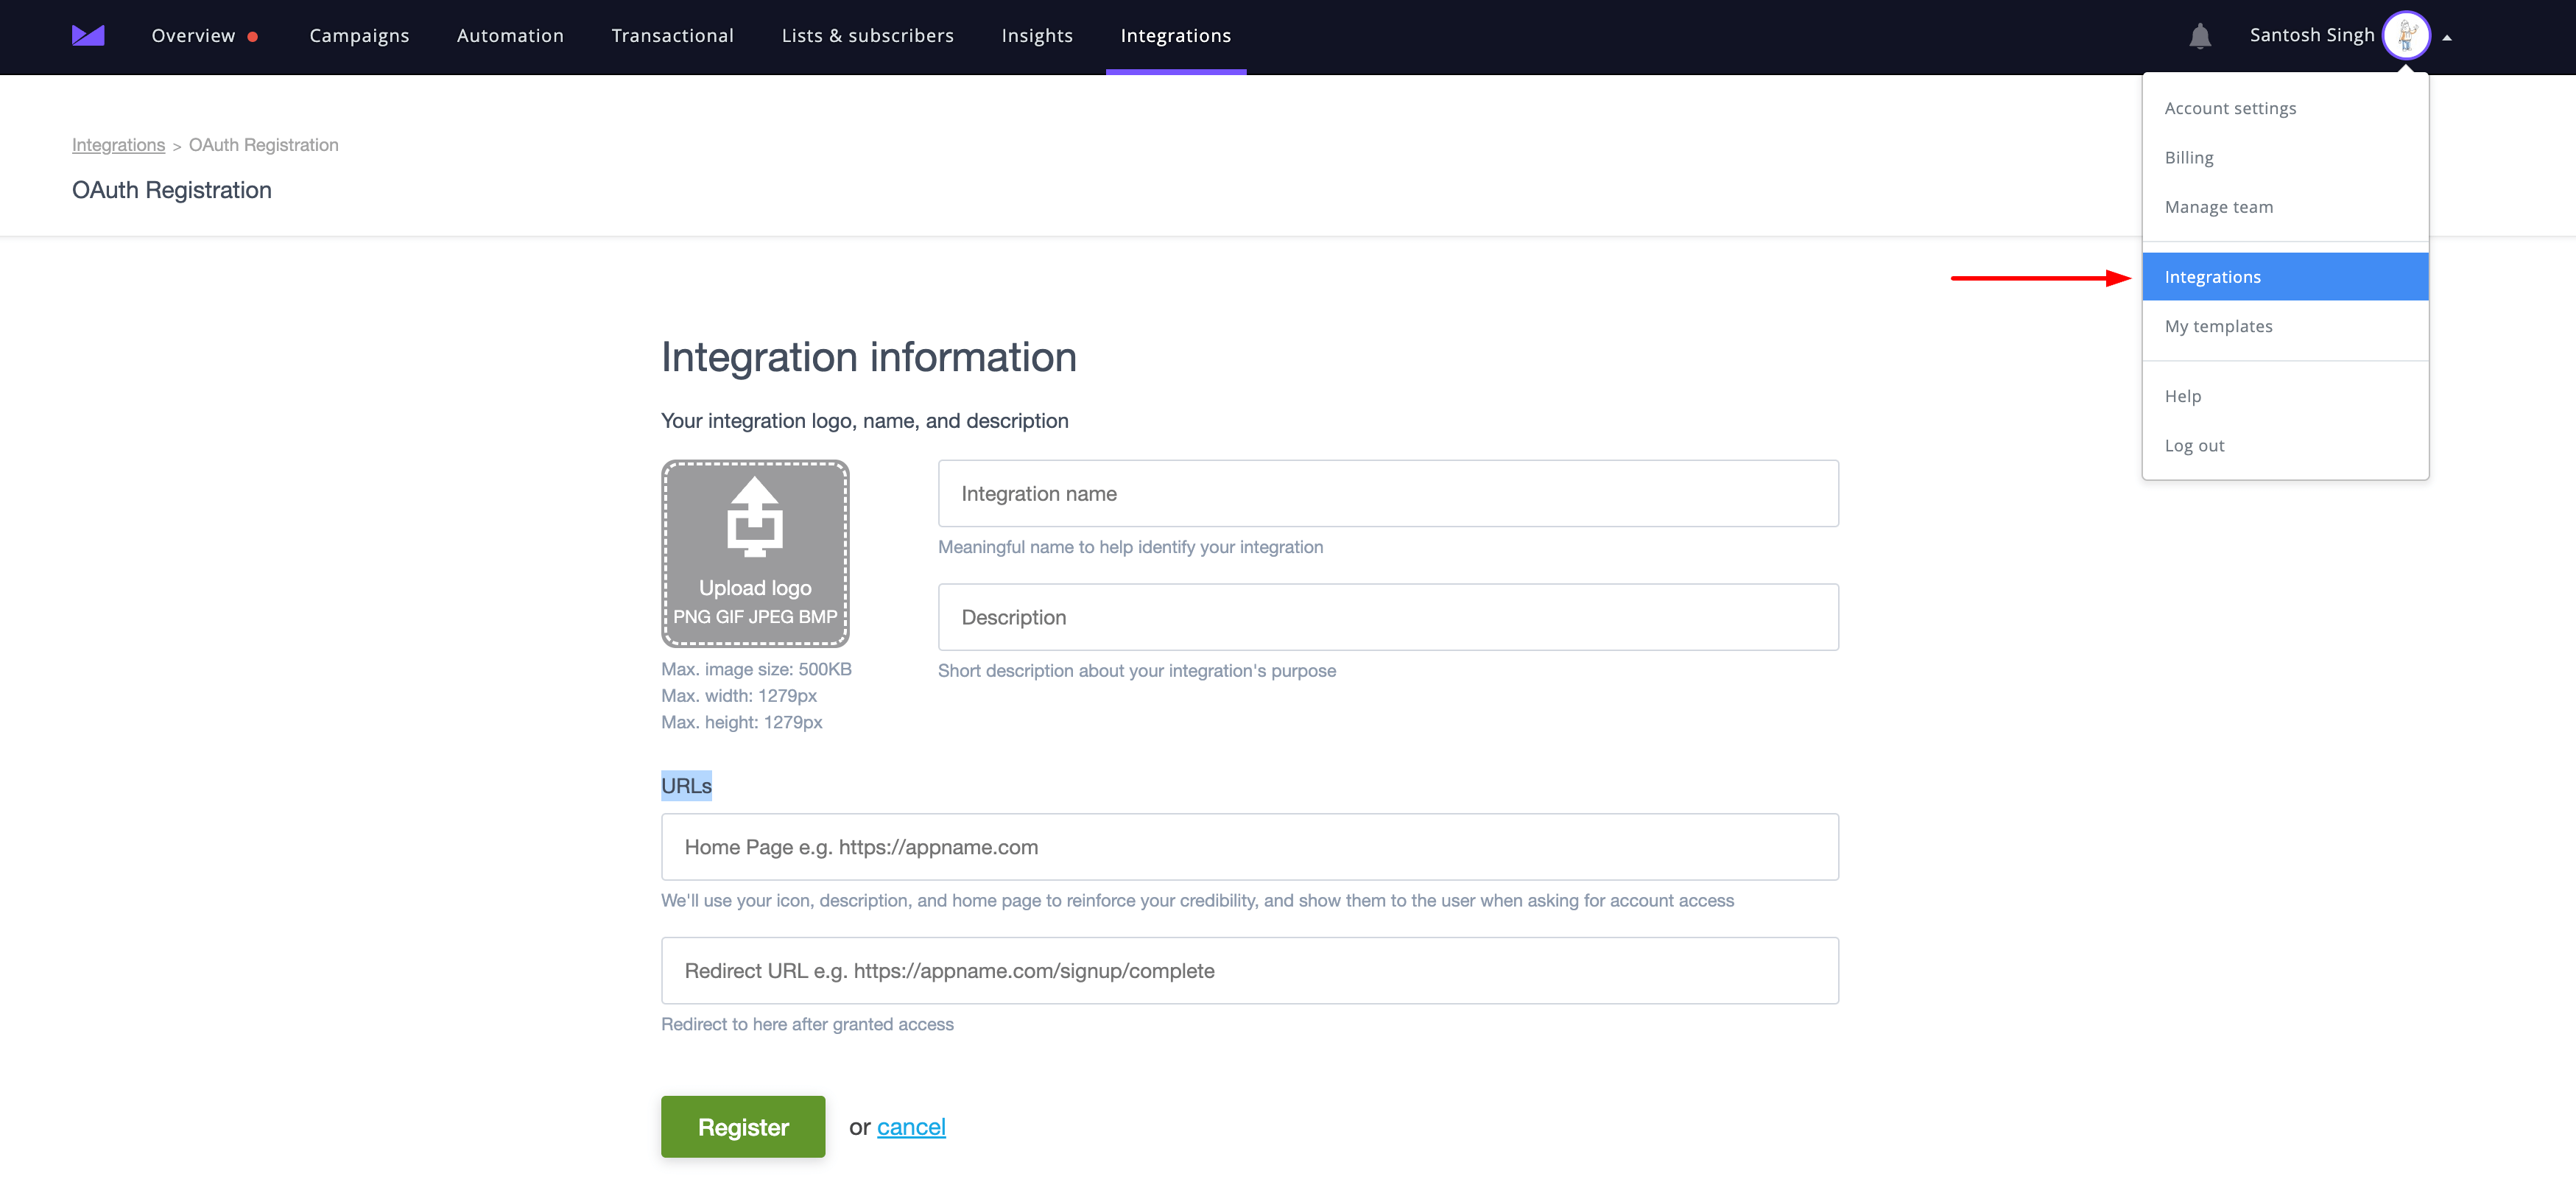
Then you need to click on "OAuth Registration" link in the right hand side as shown below:
Fill the form and just mention your domain name for URLs section as shown below:

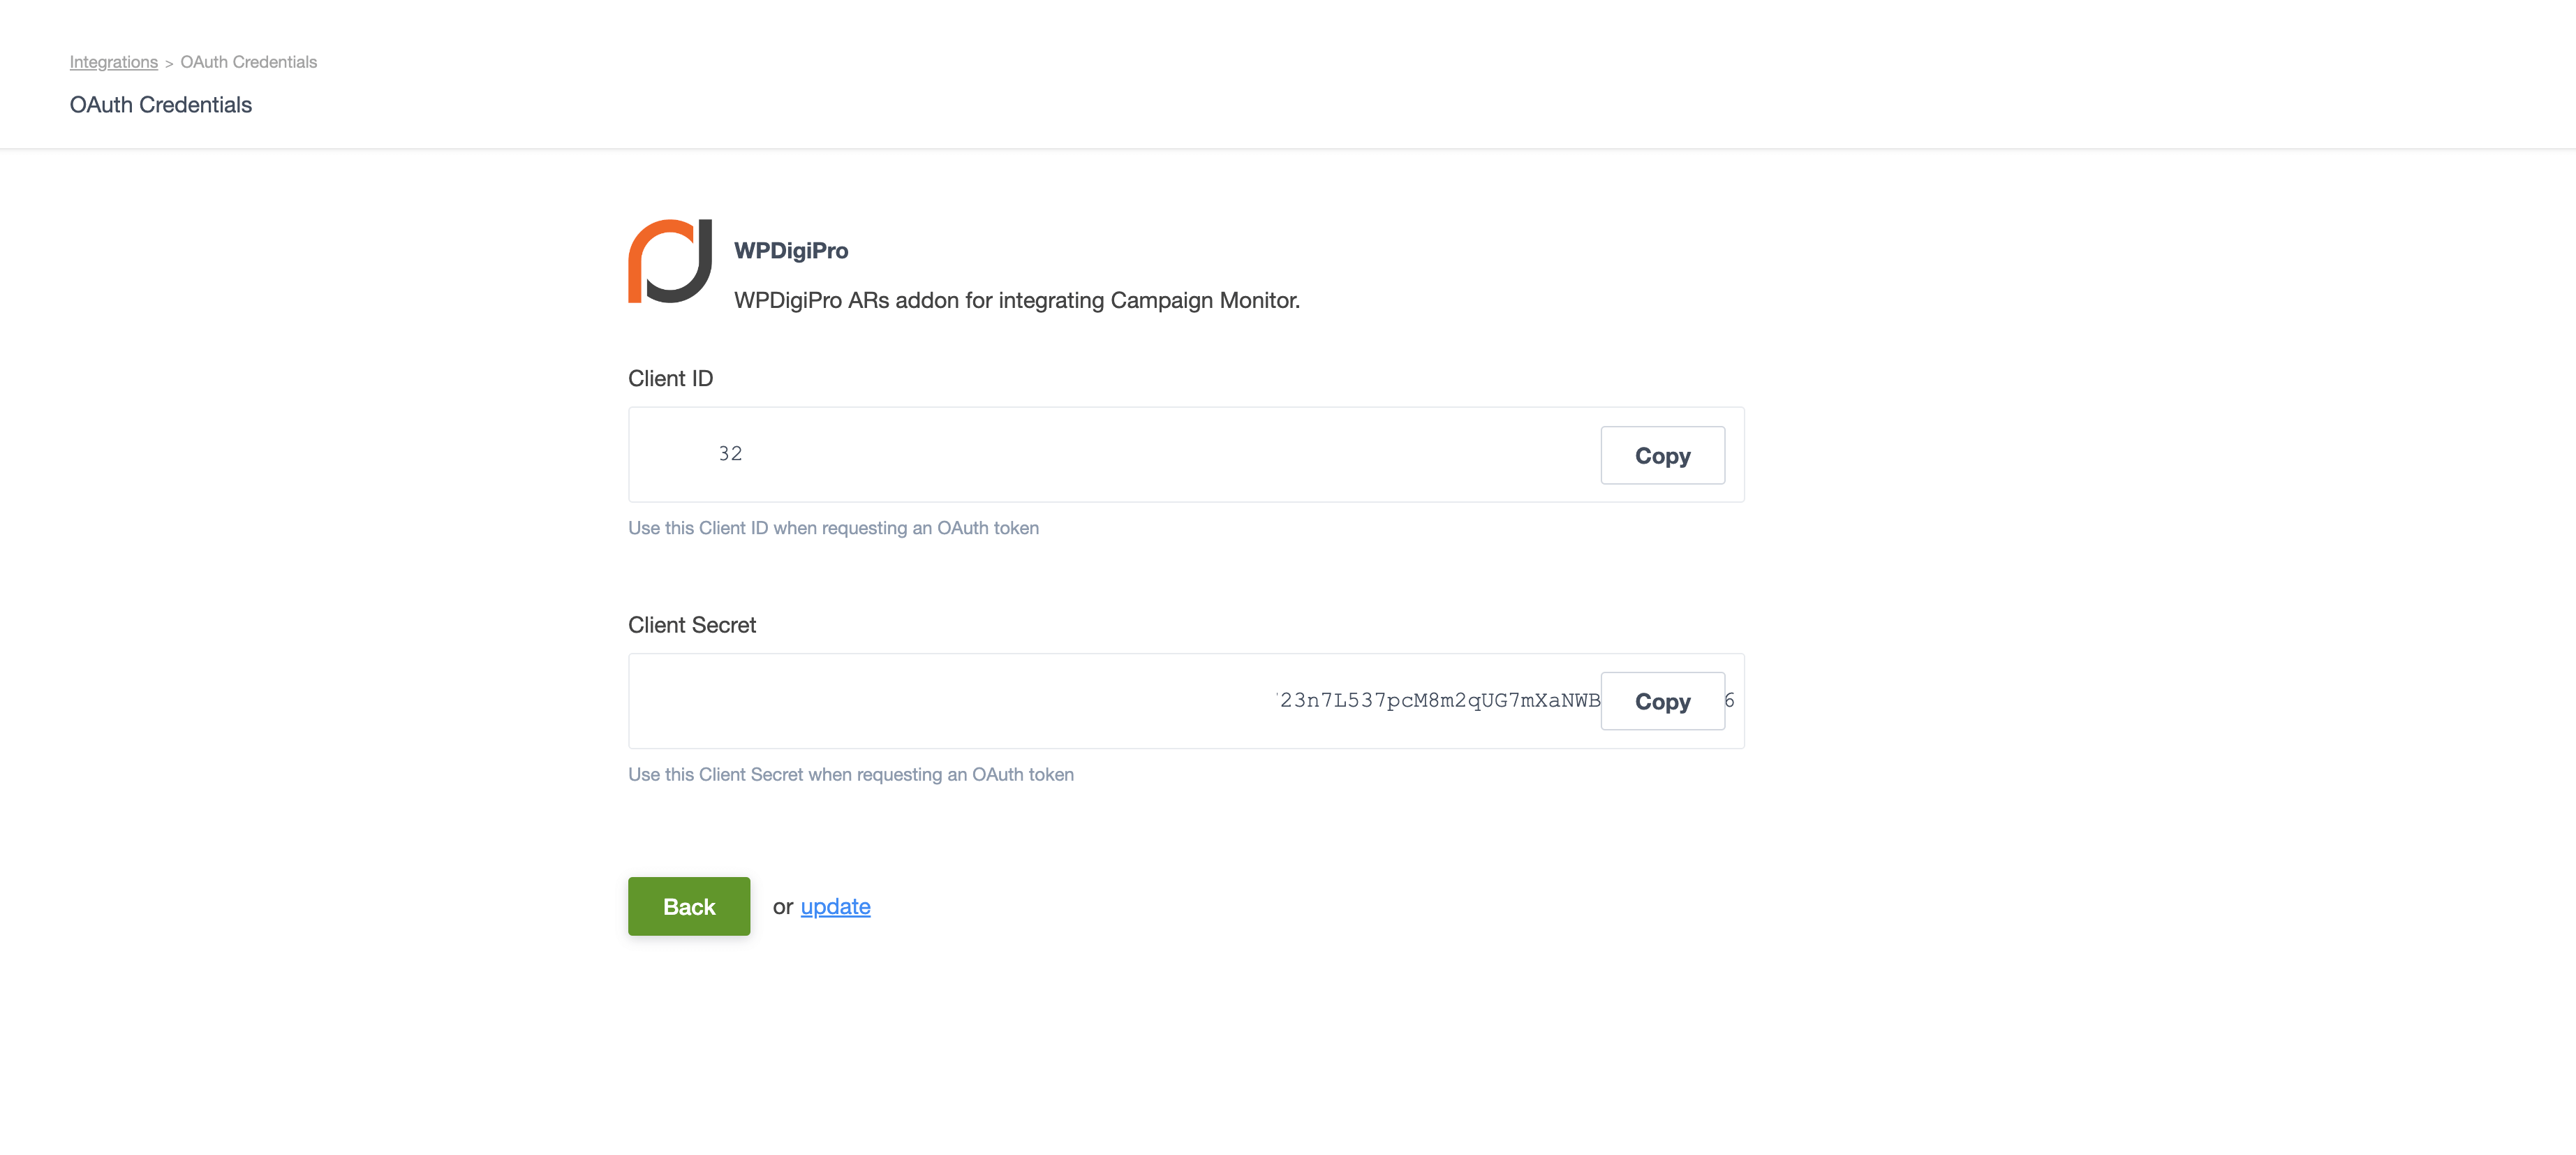
When you click on "Register" button, you will get your "Client ID" and "Client Secret" for API Access as shown below. That's it.
ConvertKit
If you don't have an account, you can create your ConvertKit account using this link.
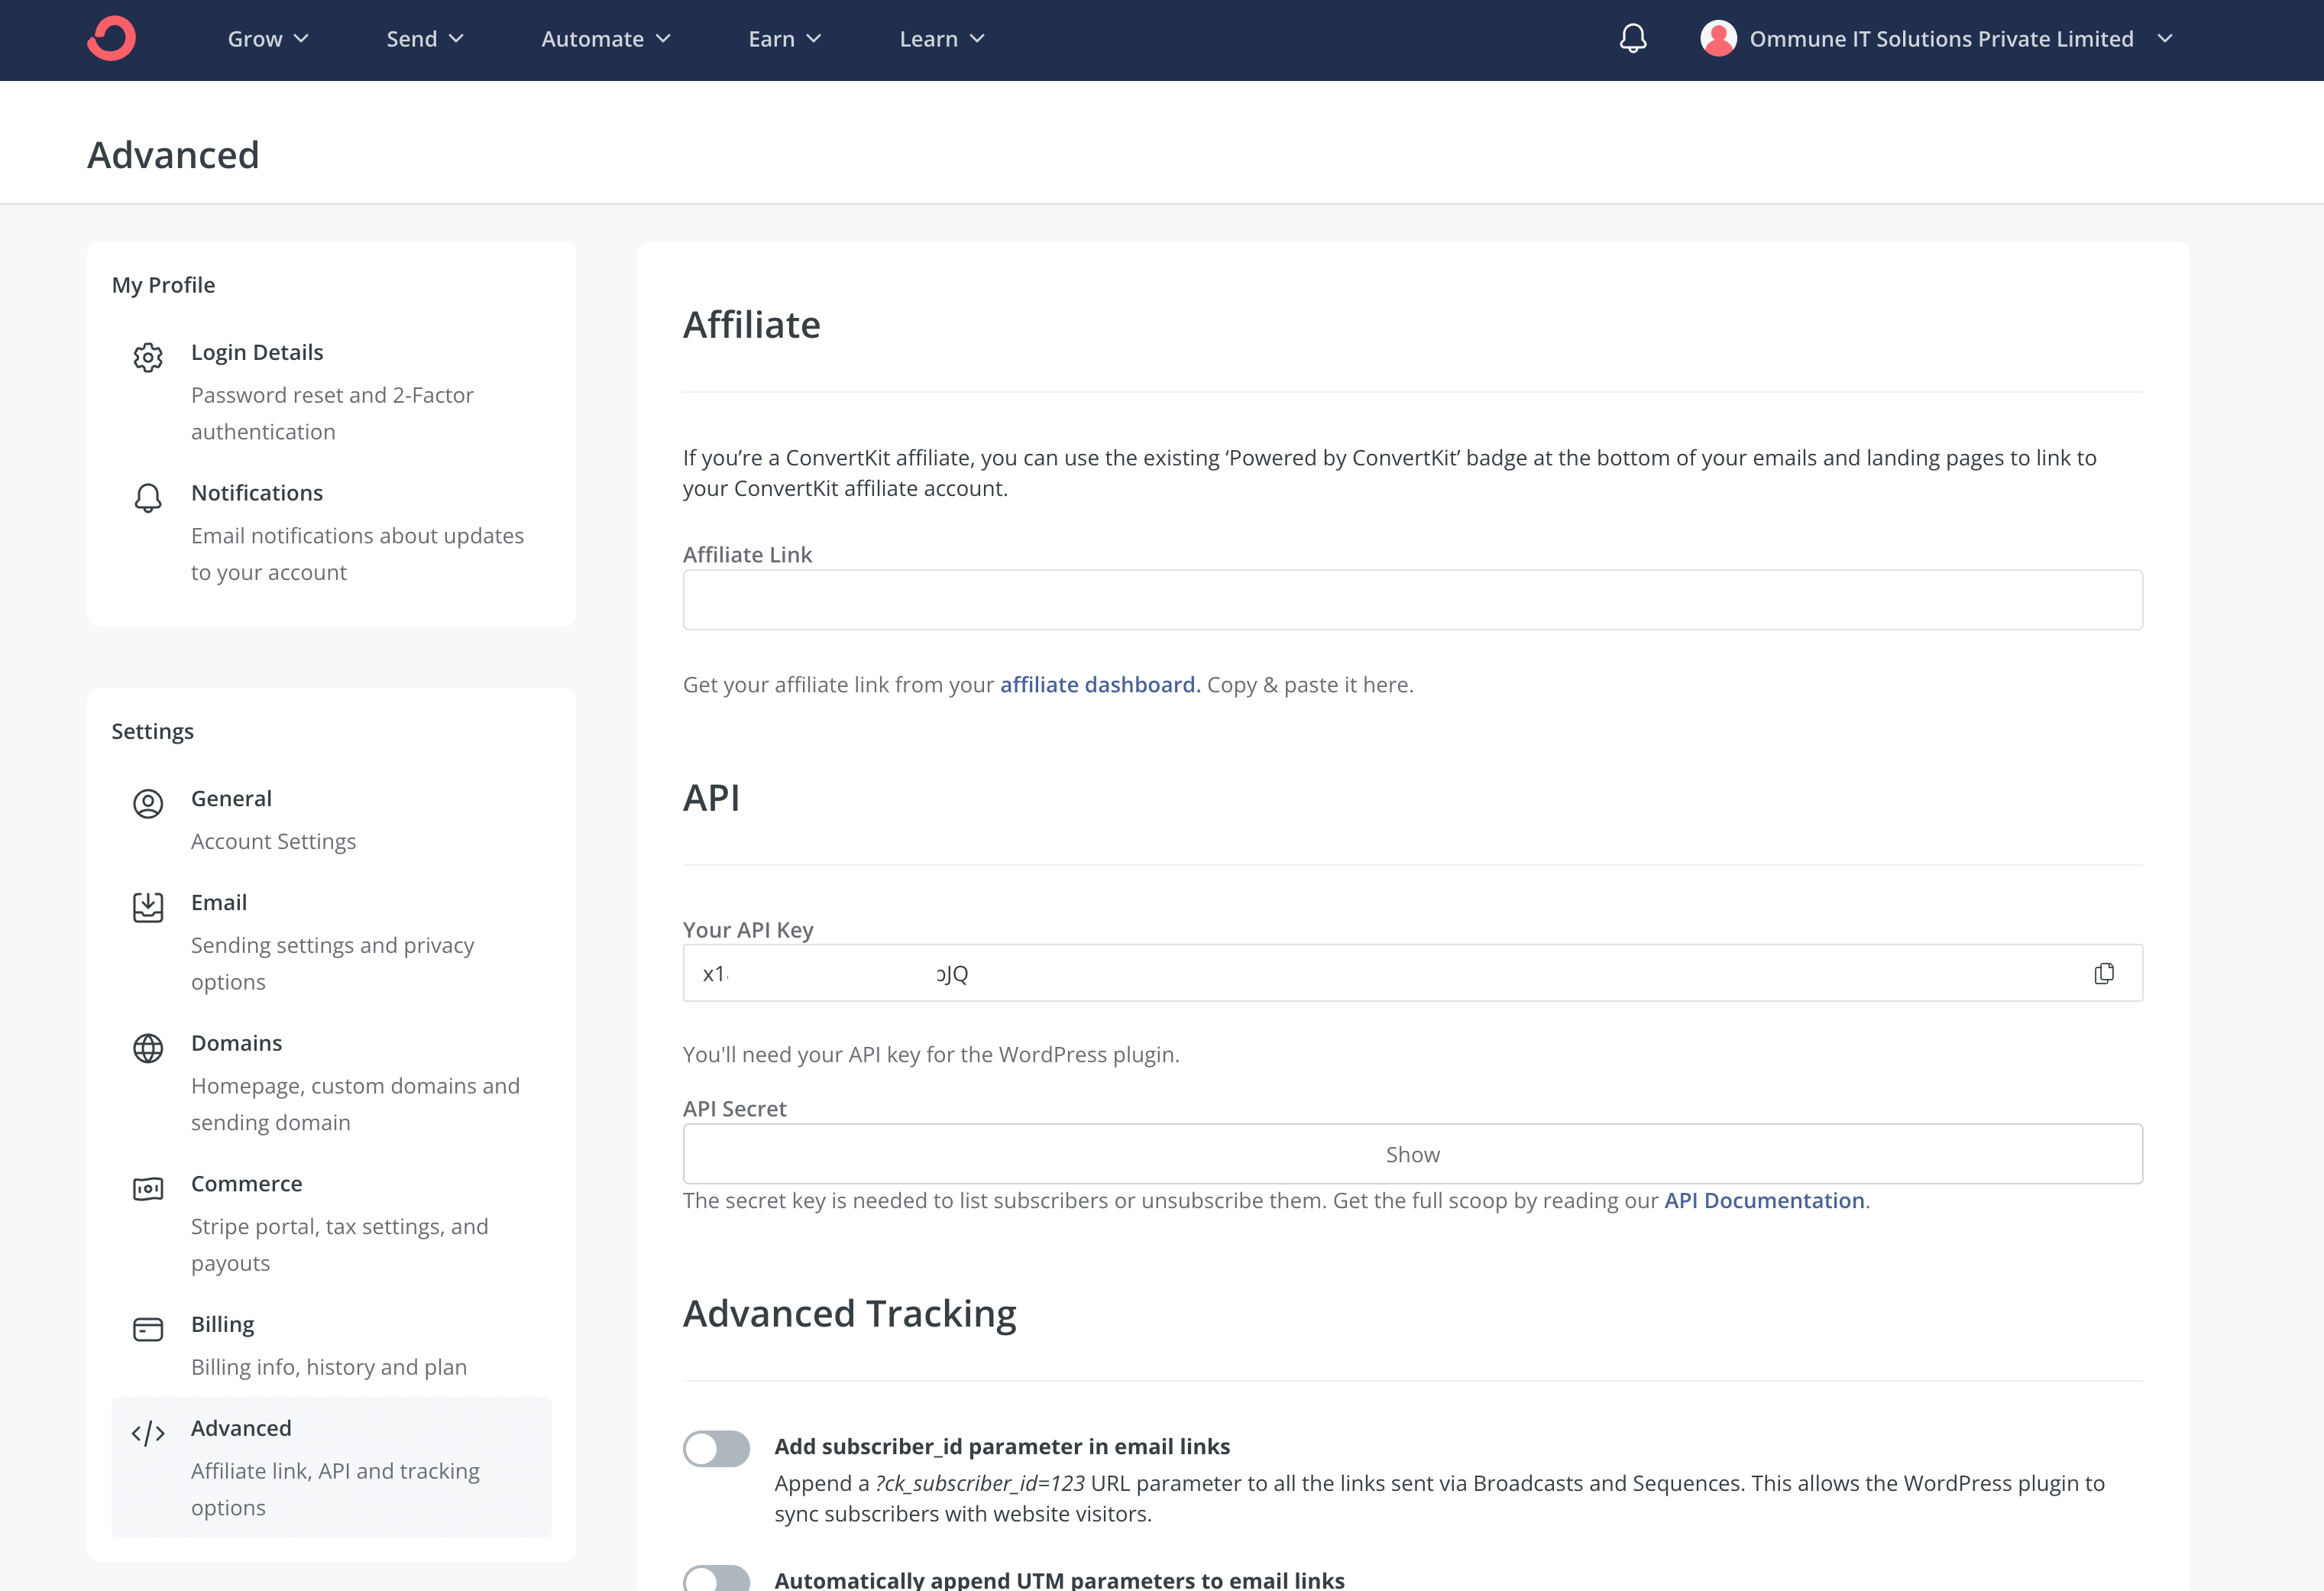
To create the "API Key" and "API Secret", just go here: : https://app.convertkit.com/account_settings/advanced_settings Please check the below screenshot for more clarity:
Constant Contact
If you don't have an account, you can create your Constant Contact account using this link.
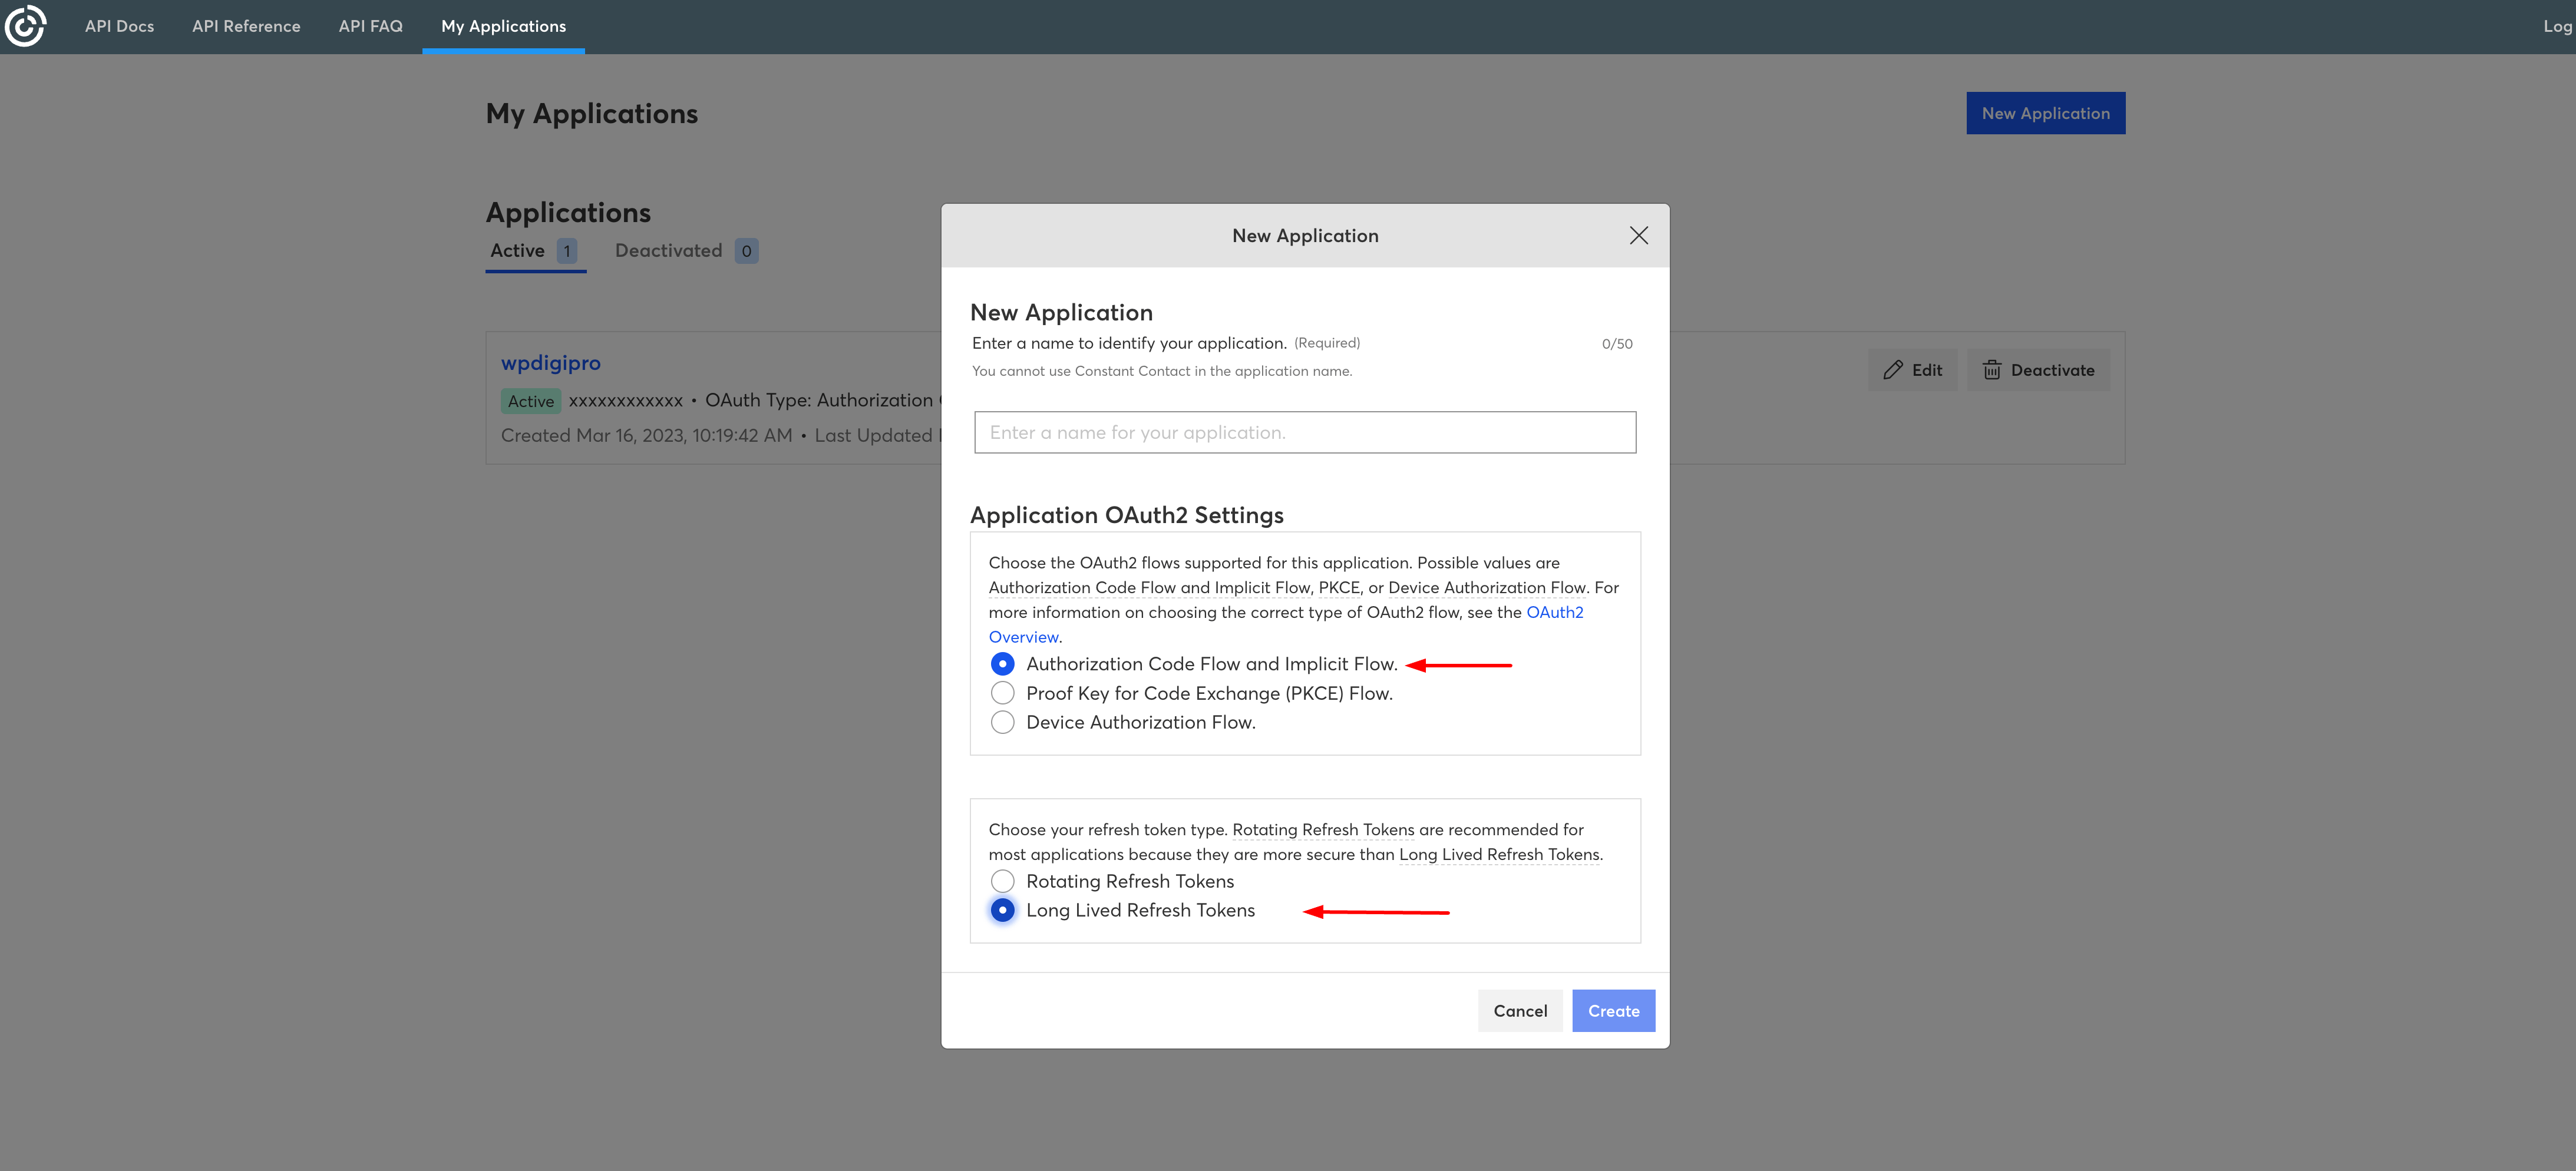
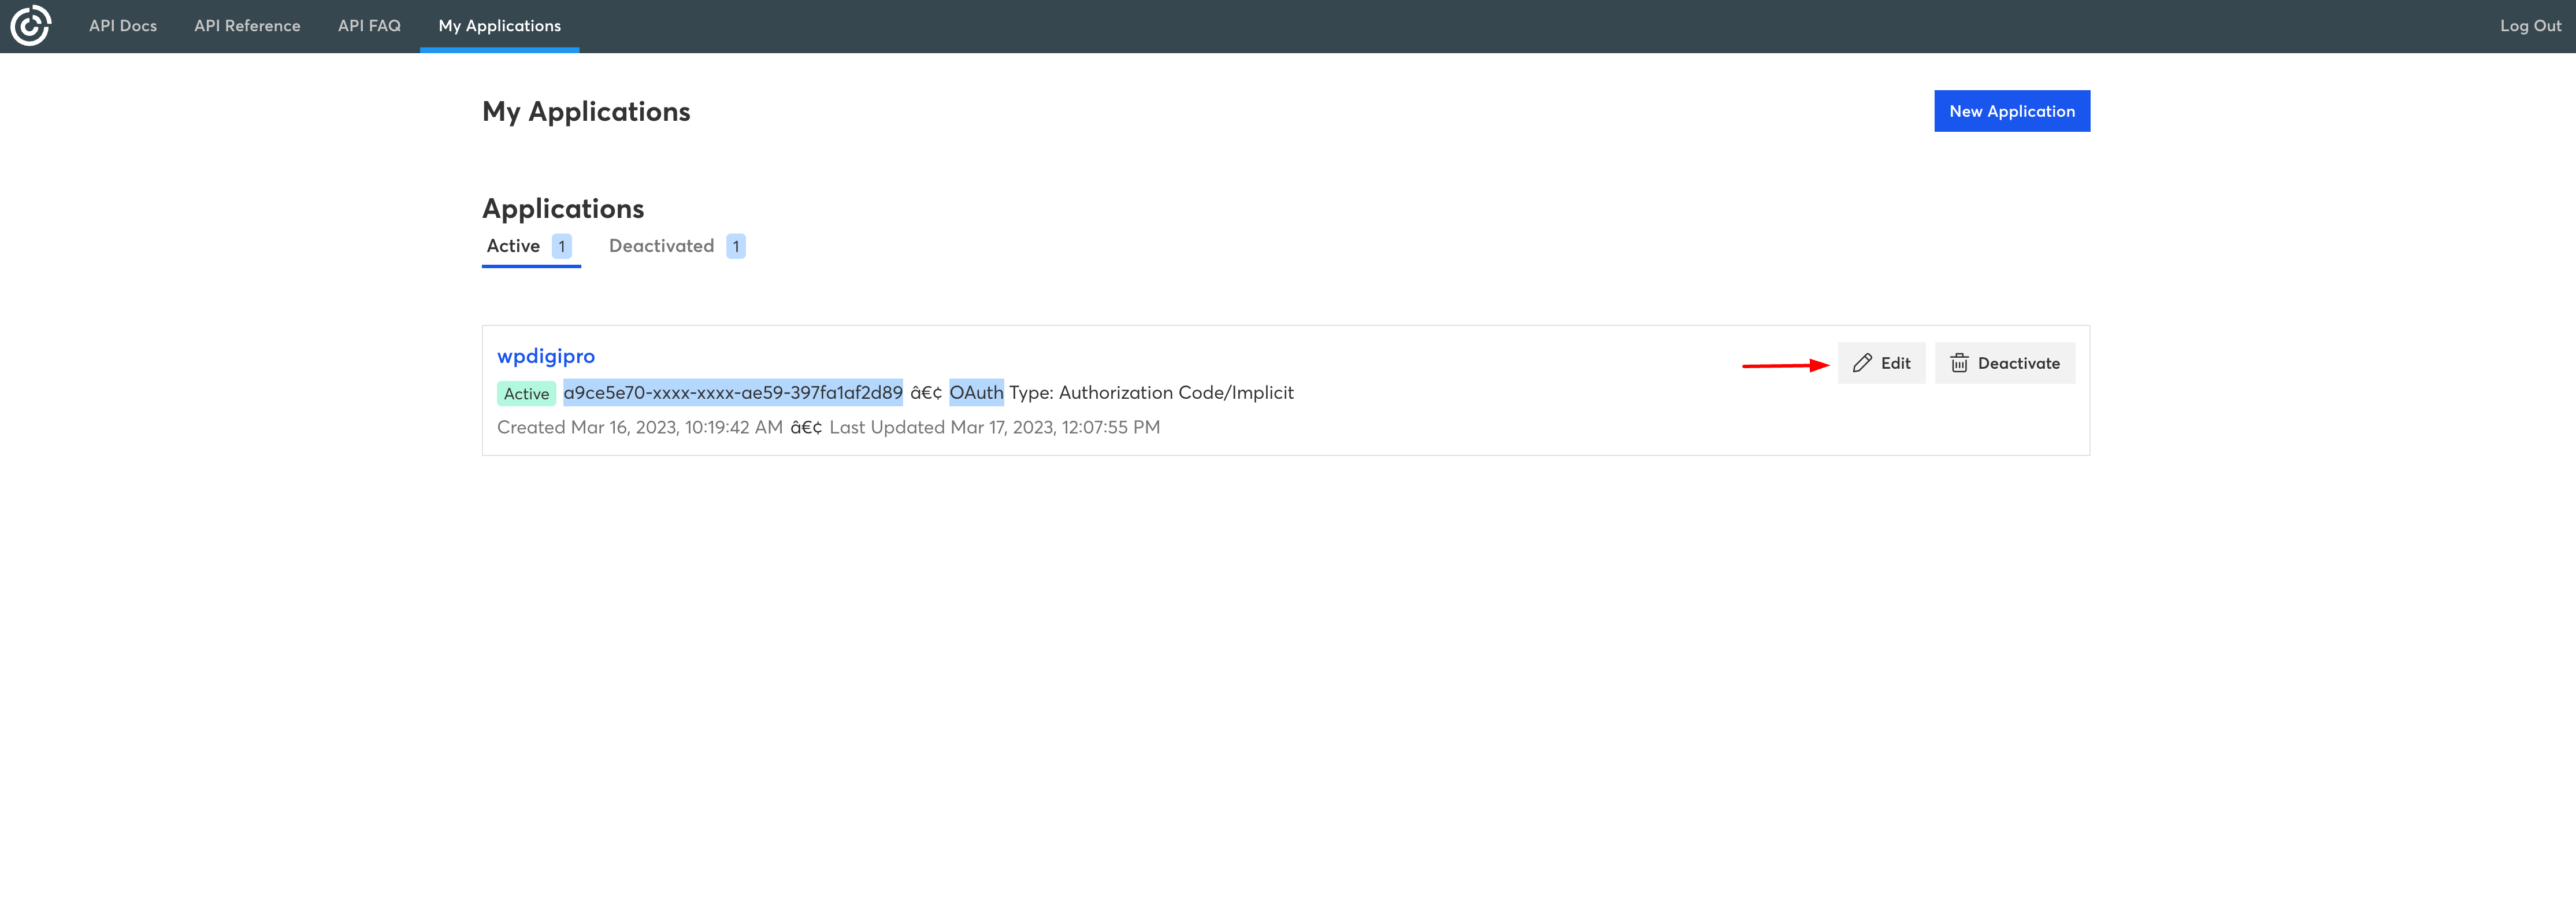
To create the "API Key (Client Id)" and "Client Secret", go here: : https://app.constantcontact.com/pages/dma/portal/ Click on "New Application" button. Select "Authorization Code Flow and Implicit Flow" and "Long Lived Refresh Tokens" as shown below:
After hitting "Create" button, your app will be created. Now you will have to click on "Edit" button as shown below:
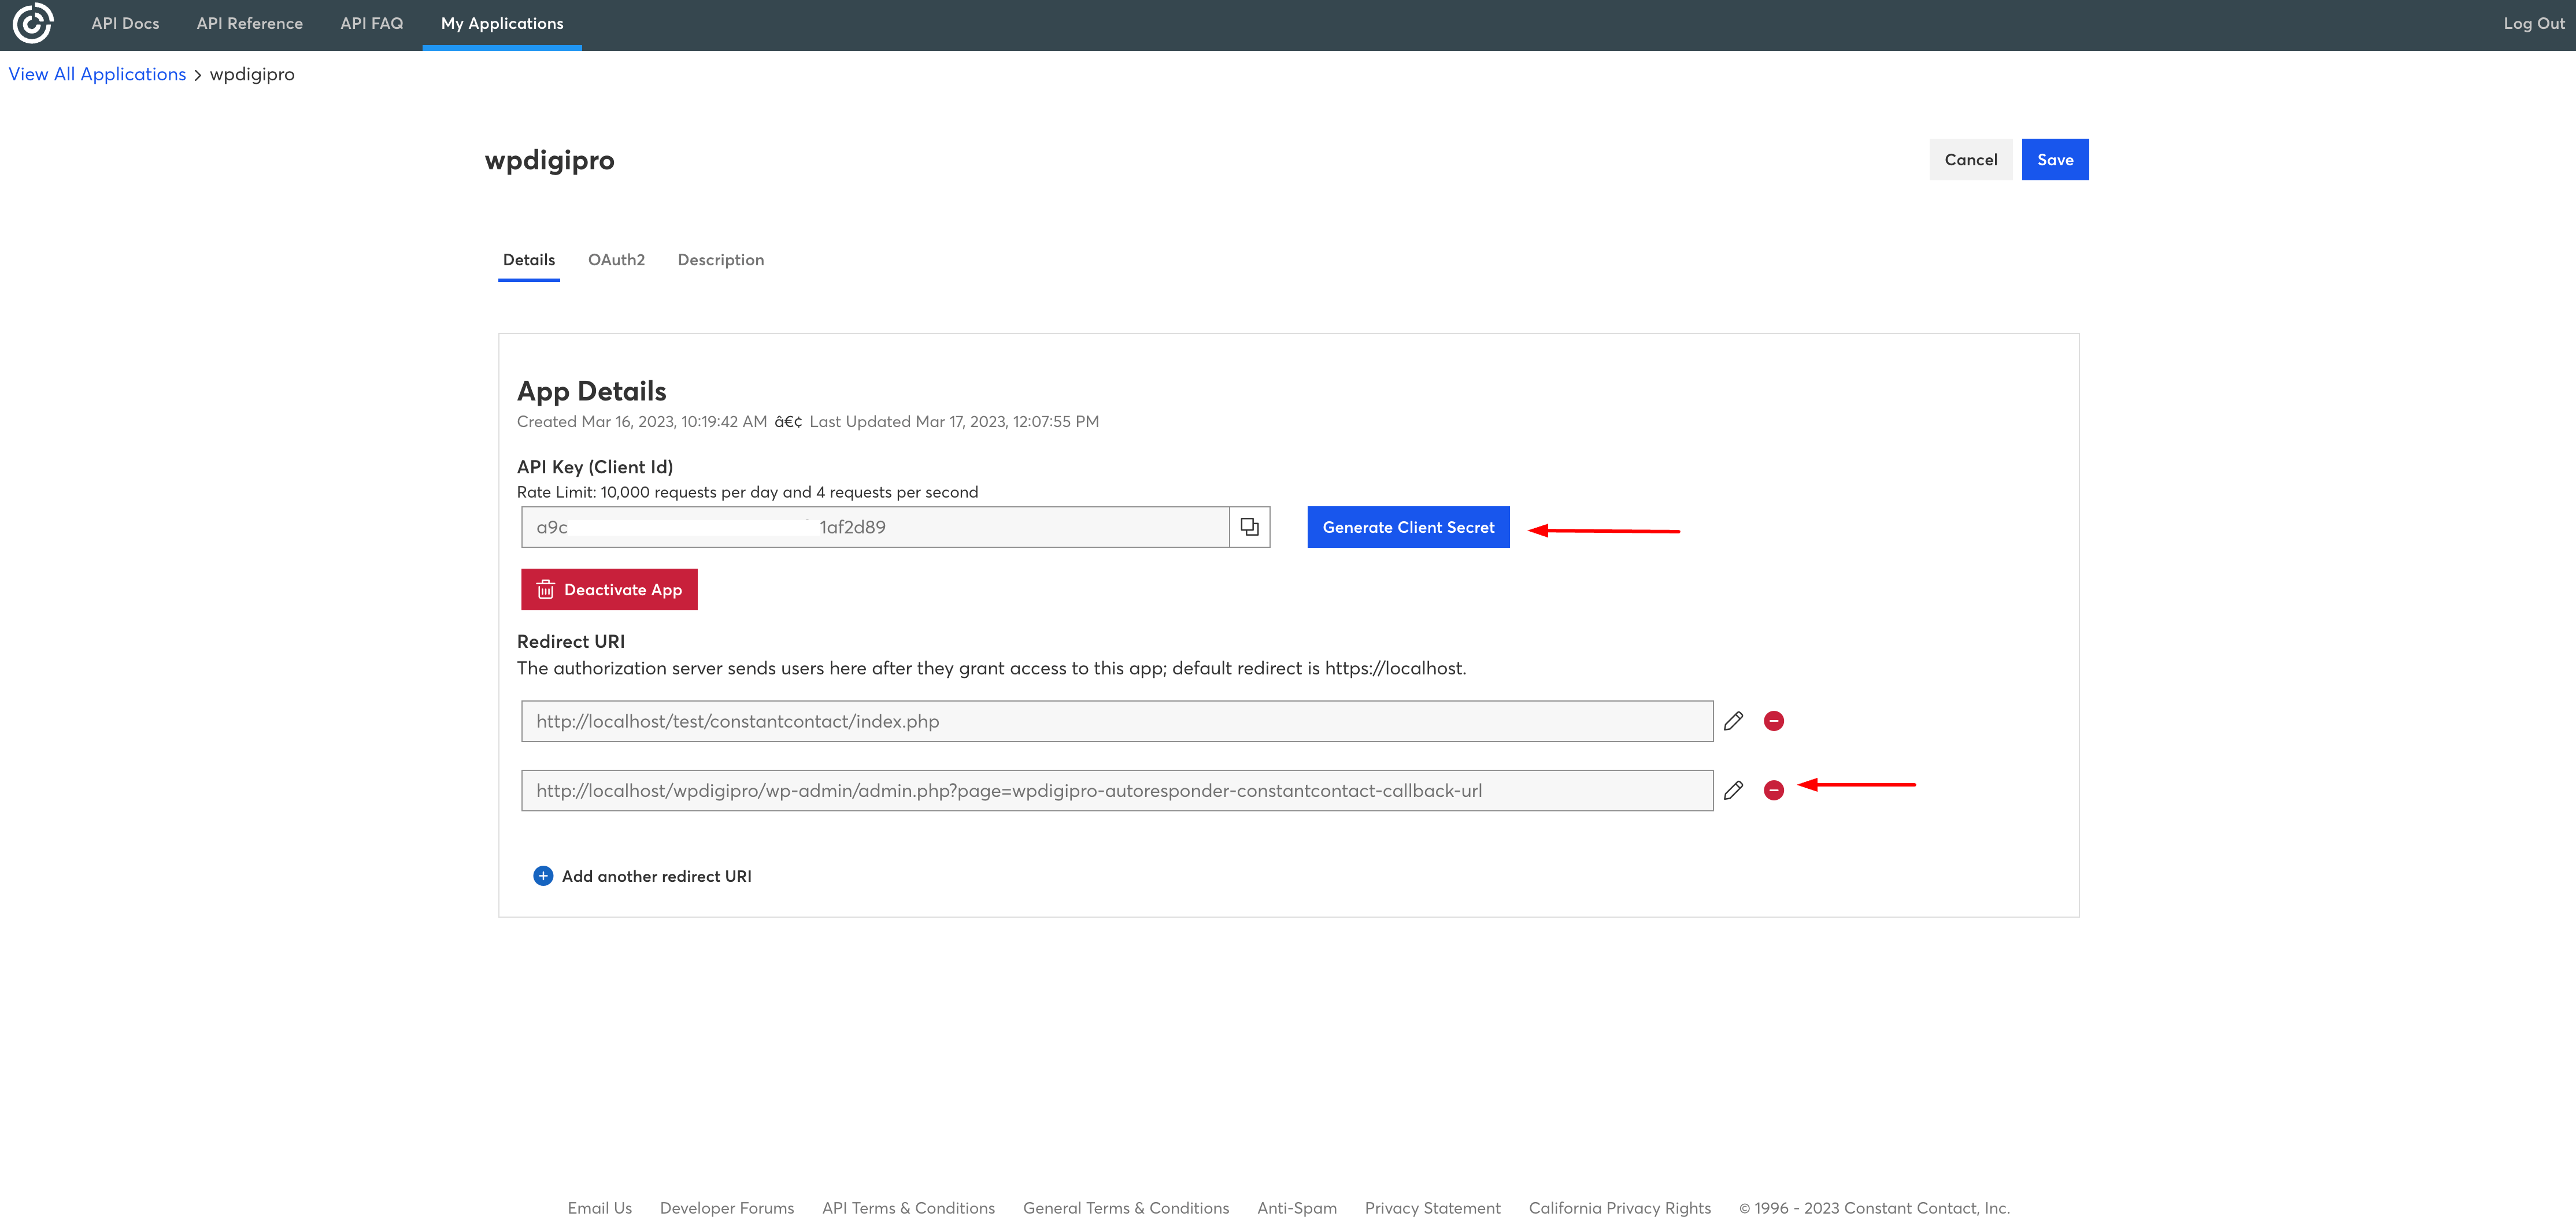
On this page, you will get your "API Key (Client Id)"" and you will be able to generate "Client Secret" after clicking on "Generate Client Secret" button as shown below. Also, you need to add Redirect URI as https://yourdomain.com/wp-admin/admin.php?page=wpdigipro-autoresponder-constantcontact-callback-url
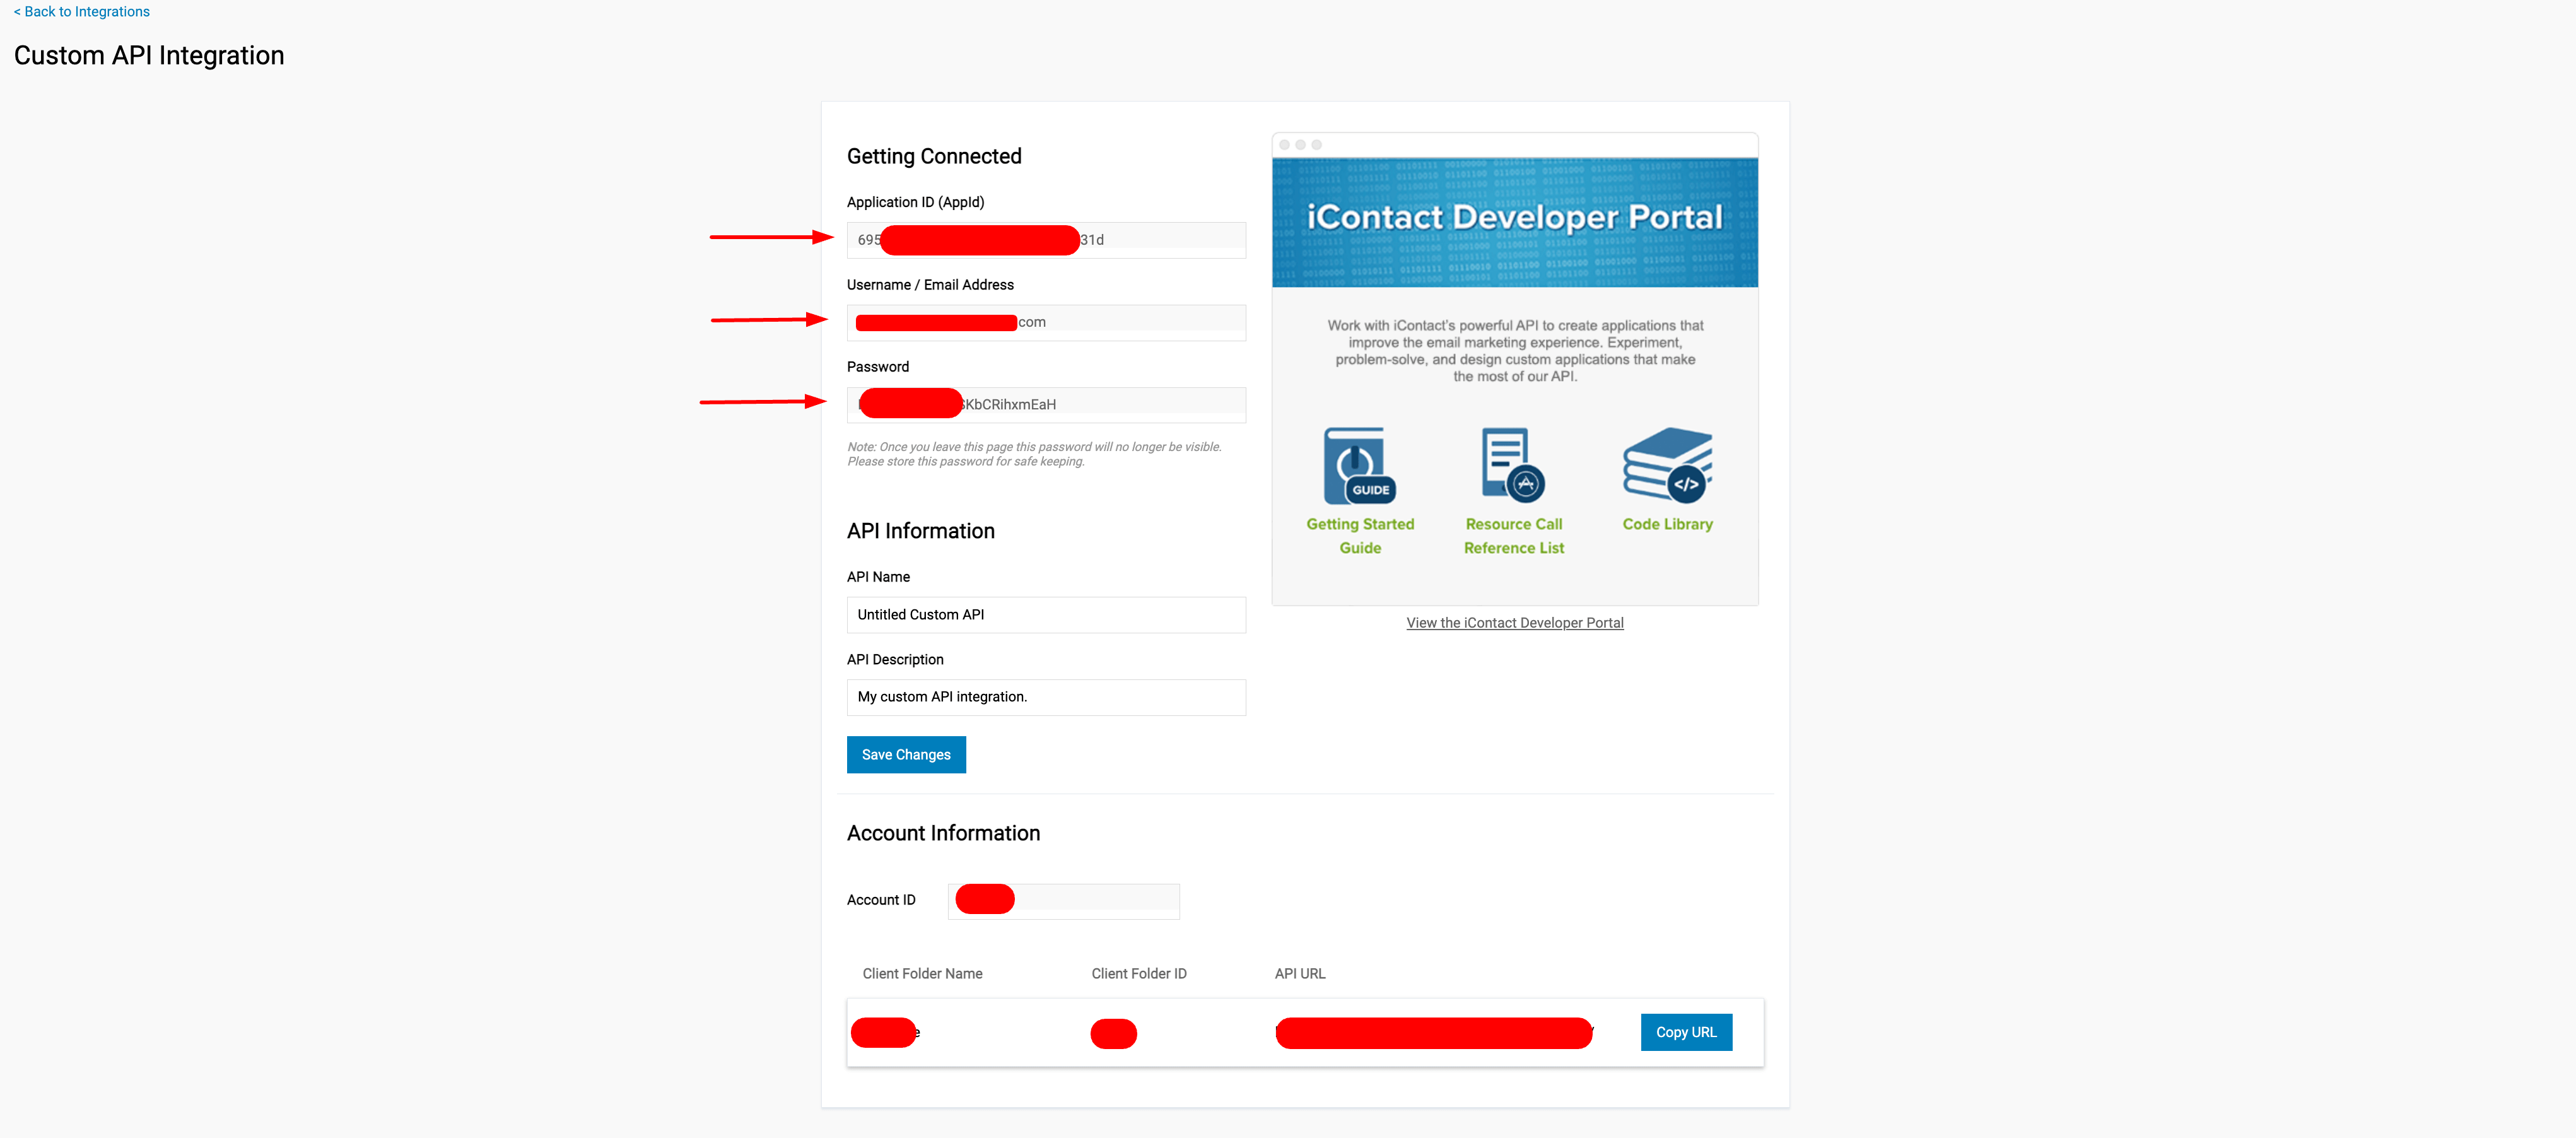
iContact
If you don't have an account, you can create your iContact account.
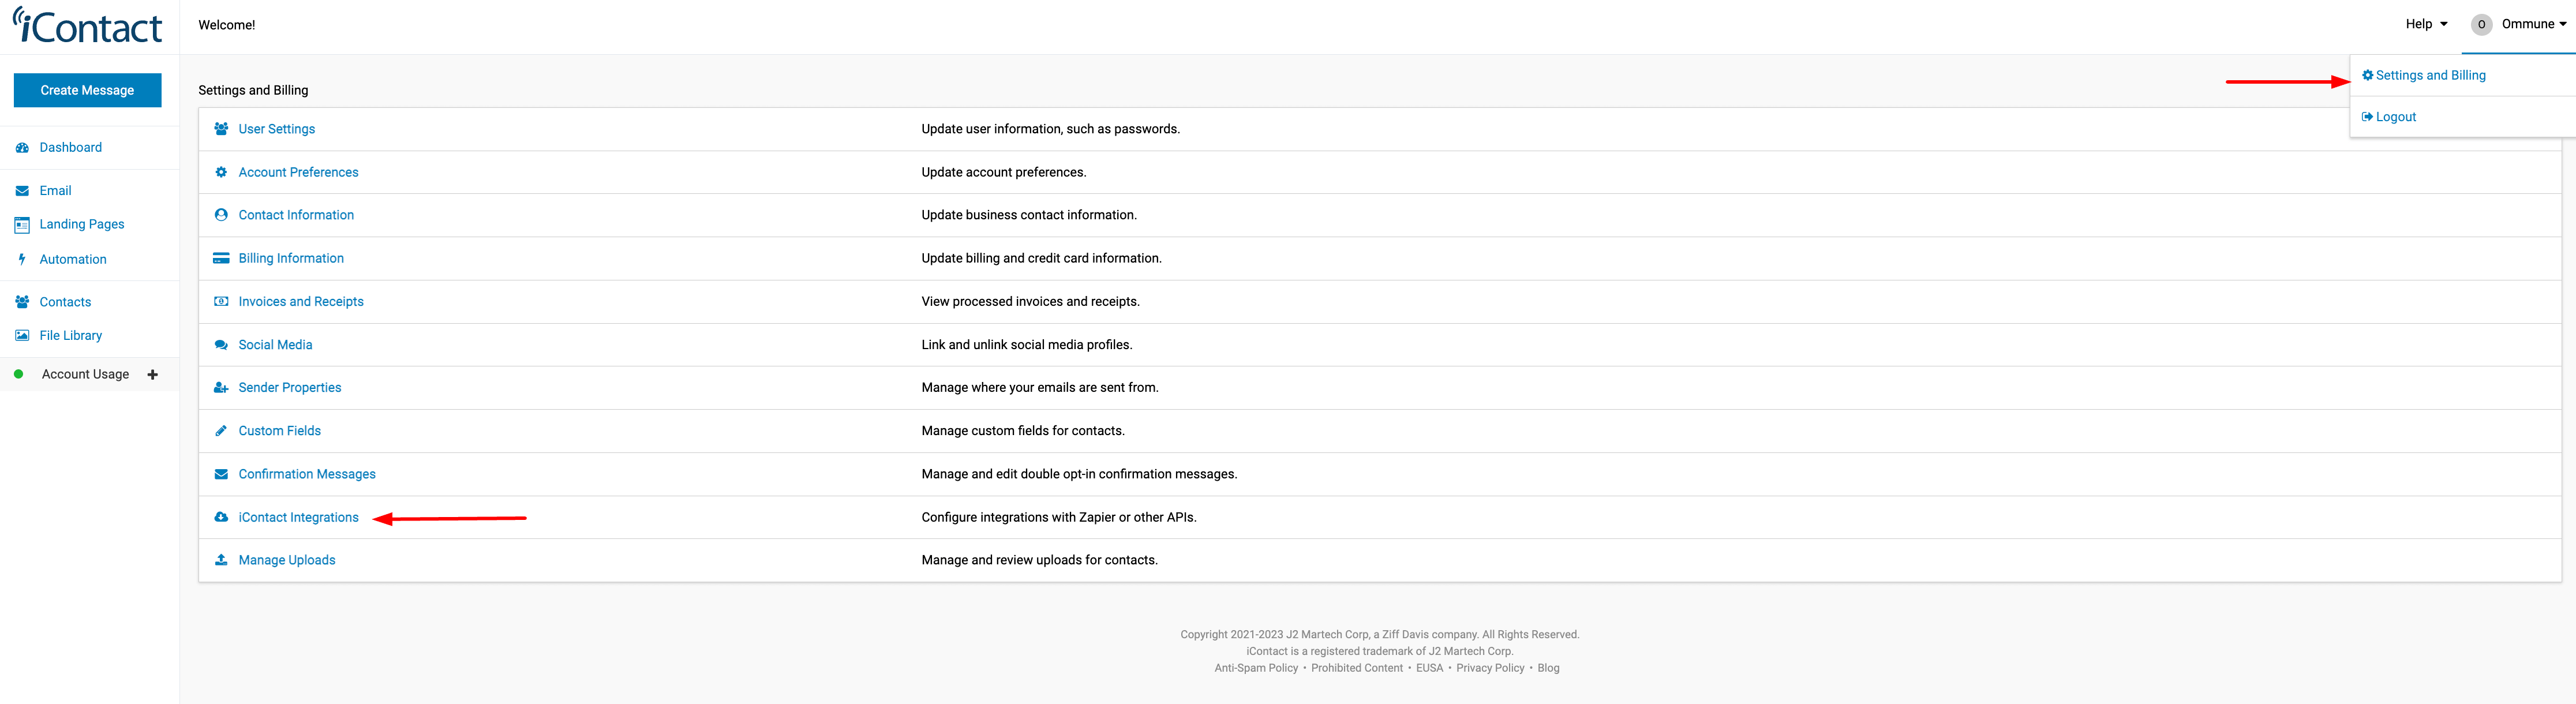
To get your AppID, Username and App Password. Check down arrow icon in extreme right hand side under your company name as shown below.
Click on "Settings and Billing" and then click on "iContact Integrations".
After that click on "Create" Button in Front of "Custom API Integrations" box as shown below:
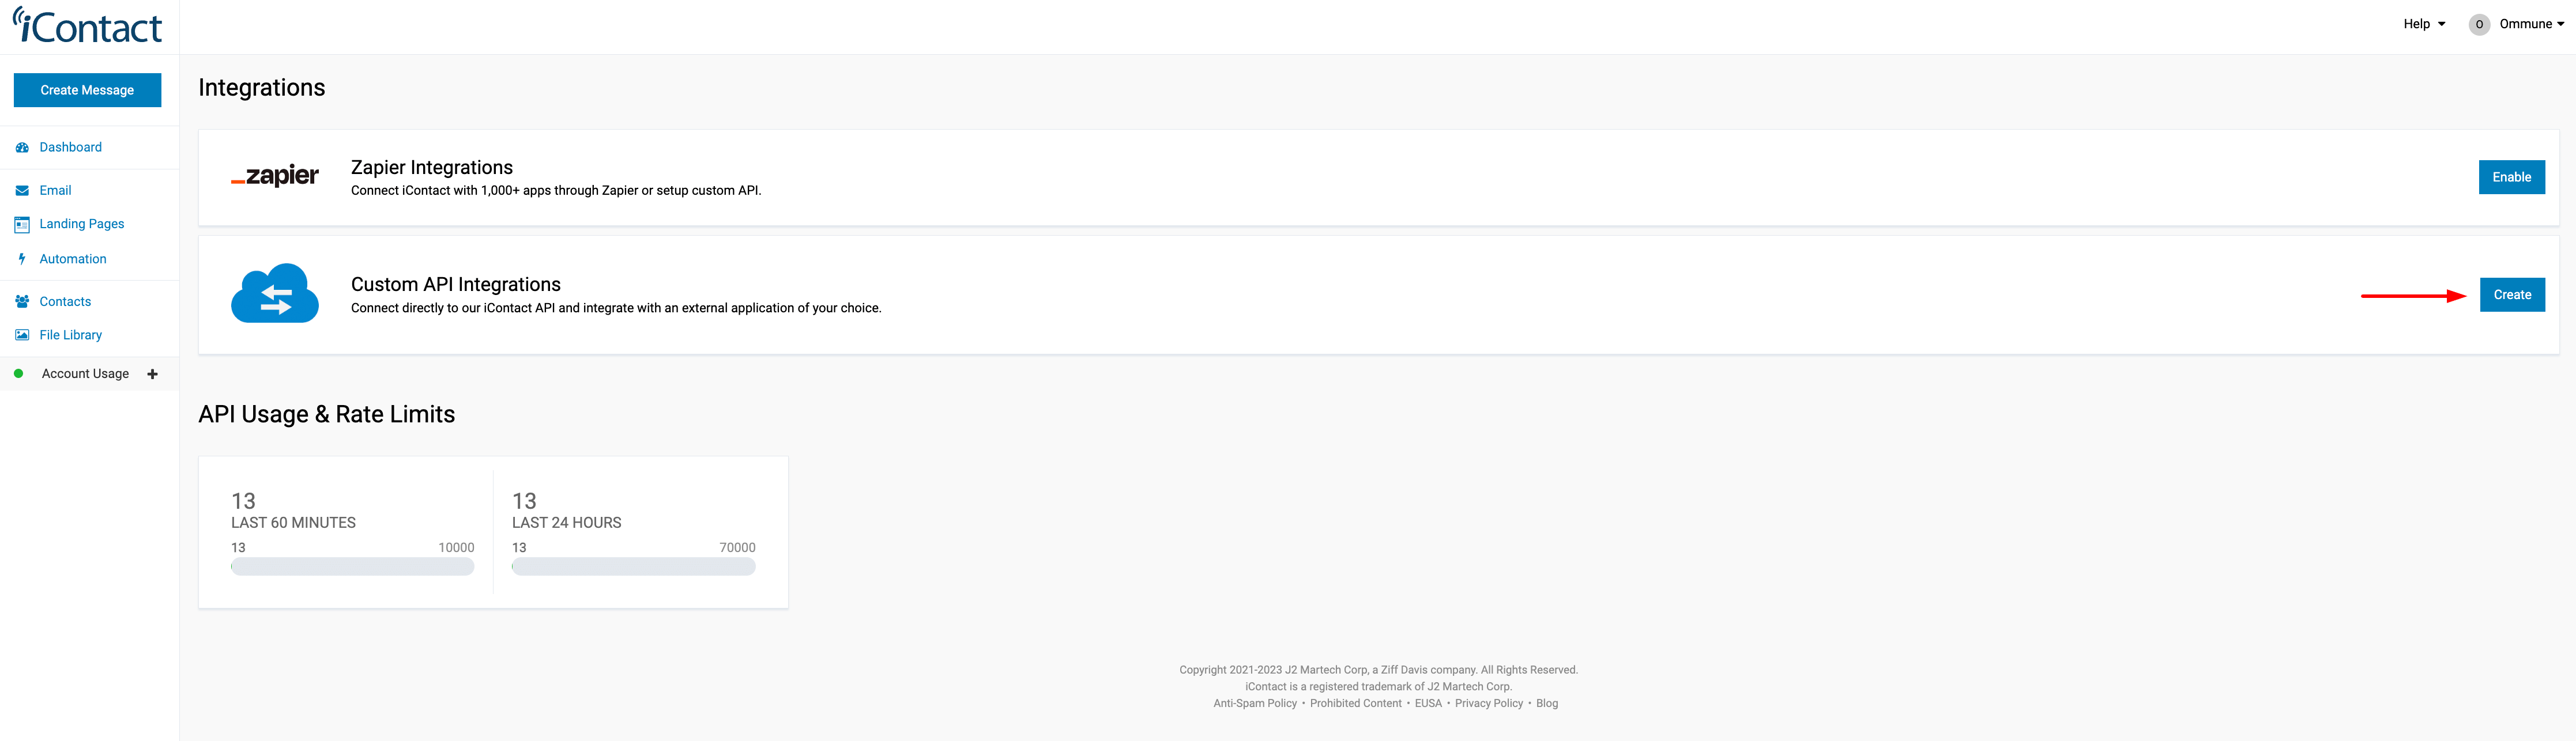
You will get all the 3 fields there: AppID, Username and App Password as shown below:
Mailwizz EMA
If you don't have Mailwizz EMA, you can buy Mailwizz EMA using this link.
Suppse you install MailWizz at https://yourdomain.com/mailwizz then your API URL will be https://yourdomain.com/mailwizz/api/index.php
To get the "Public Key" just go here: : https://yourdomain.com/mailwizz/customer/index.php/api-keys/index and click on "Create New" button as shown below:
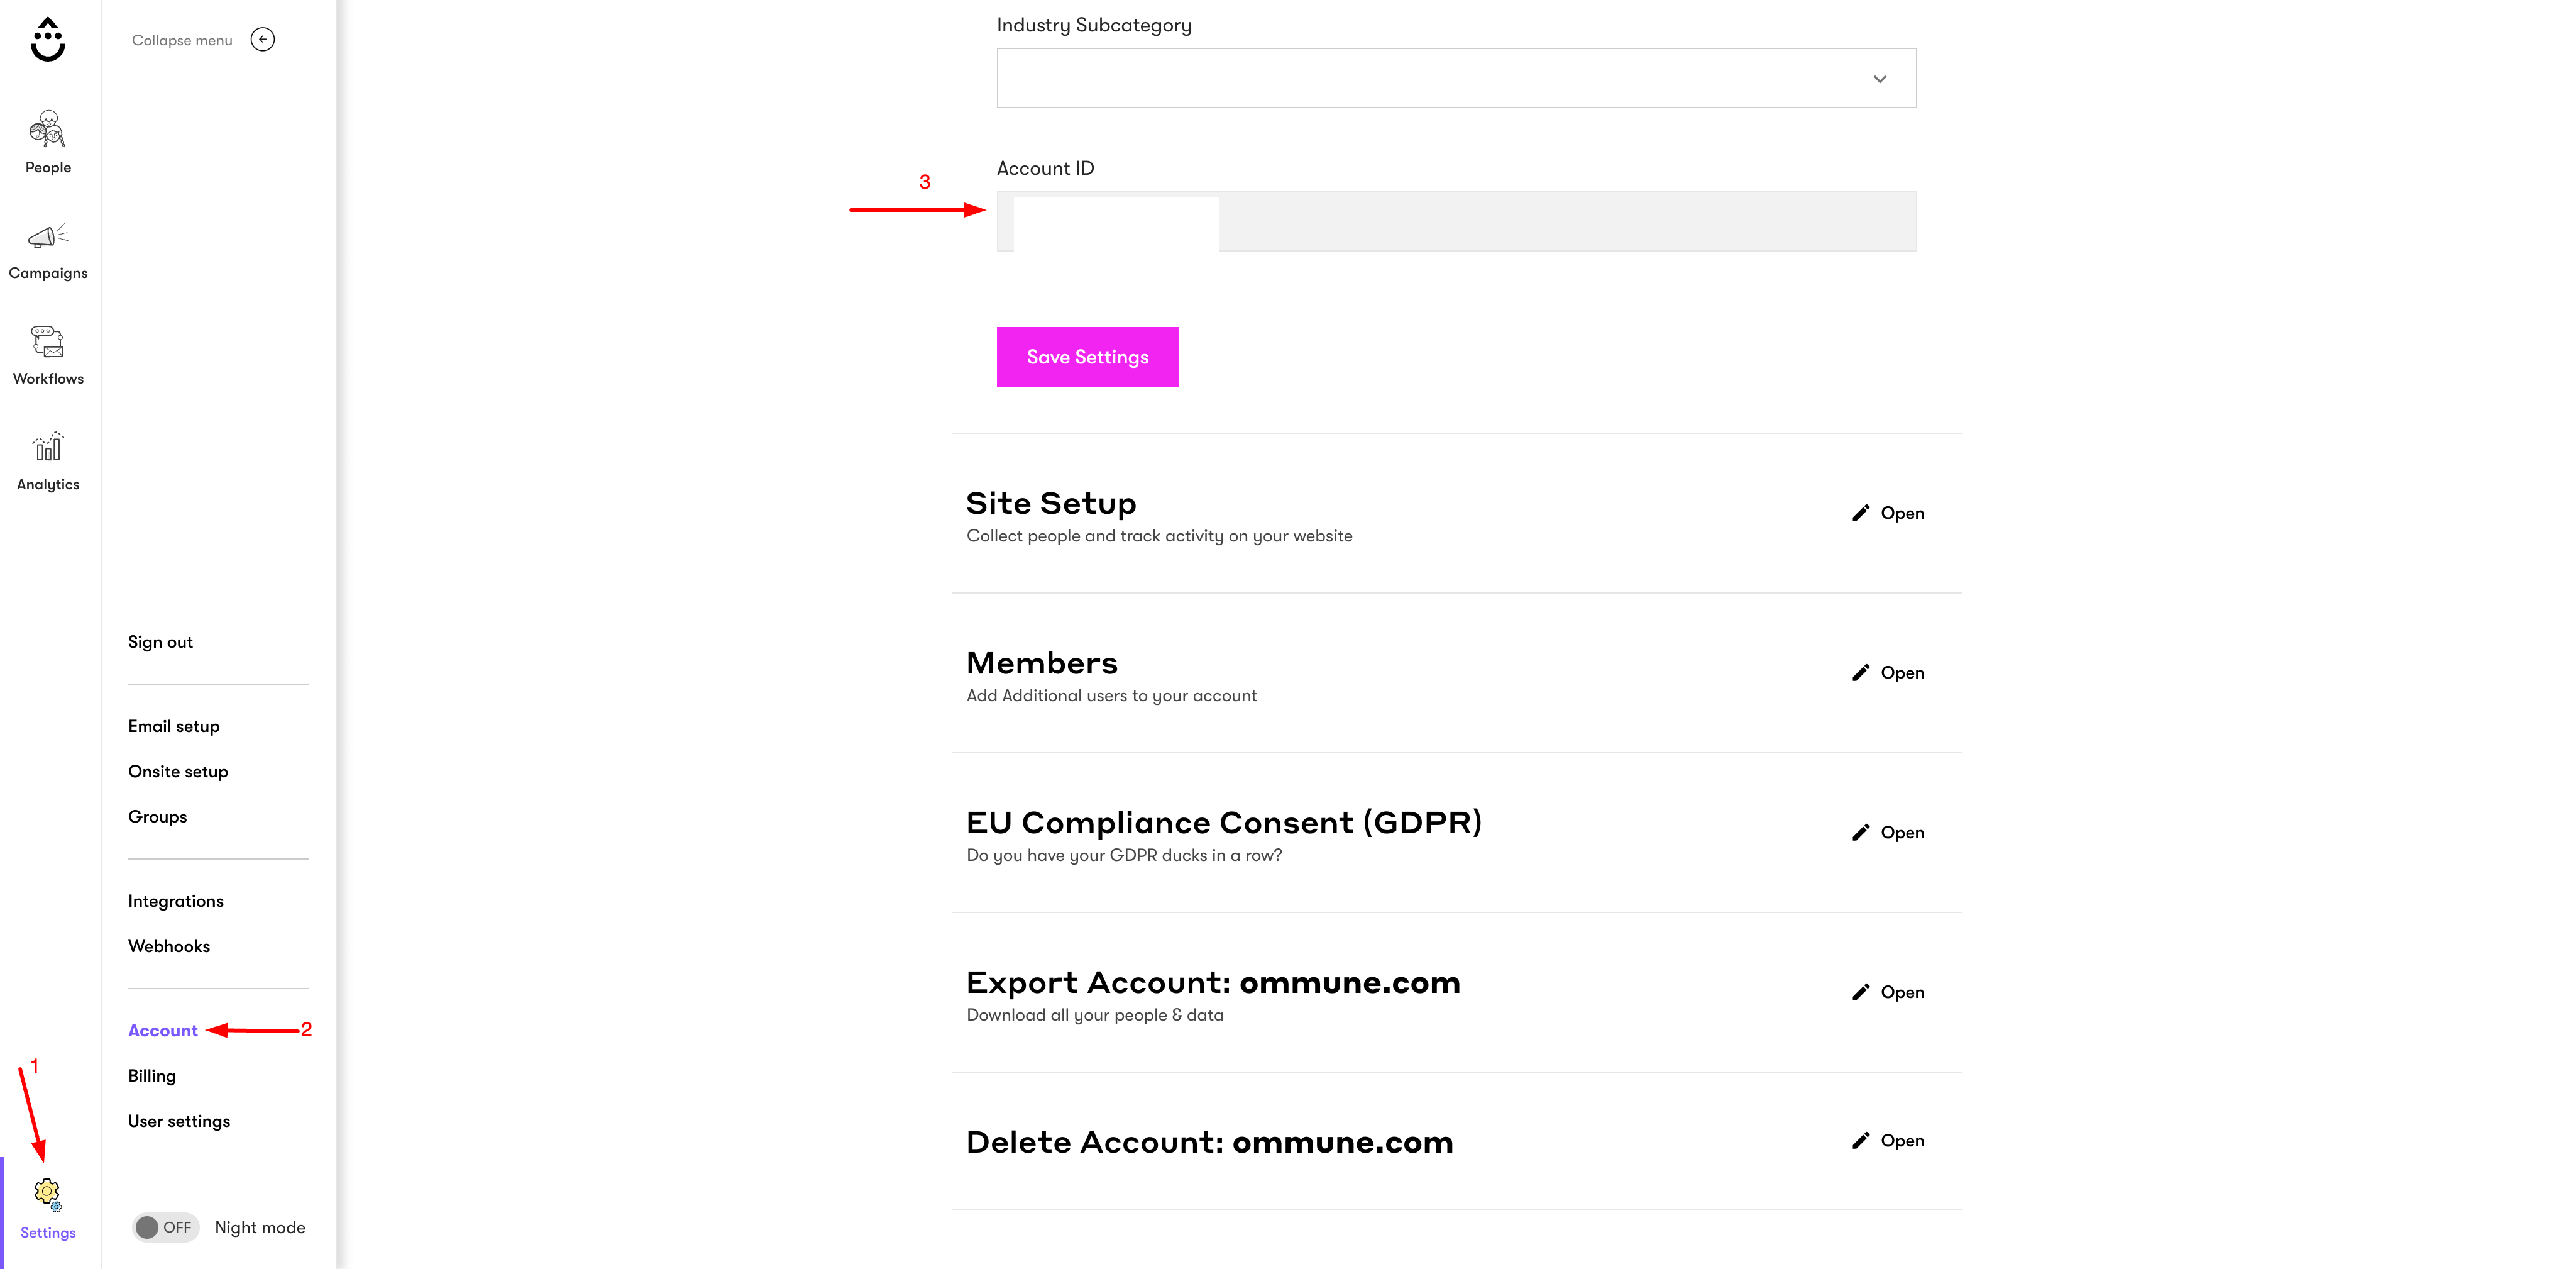
Drip
If you don't have an account, you can create your Drip account using this link.
To get the "API Token" just go here: : https://www.getdrip.com/user/edit
To get the "Account ID" just follow following screenshot
Mautic
If you don't have Mautic, you can download Mautic for free using this link.
Suppse you install Mautic at https://yourdomain.com/mautic then first of all you need to enable API here https://yourdomain.com/mautic/s/config/edit as shown below:
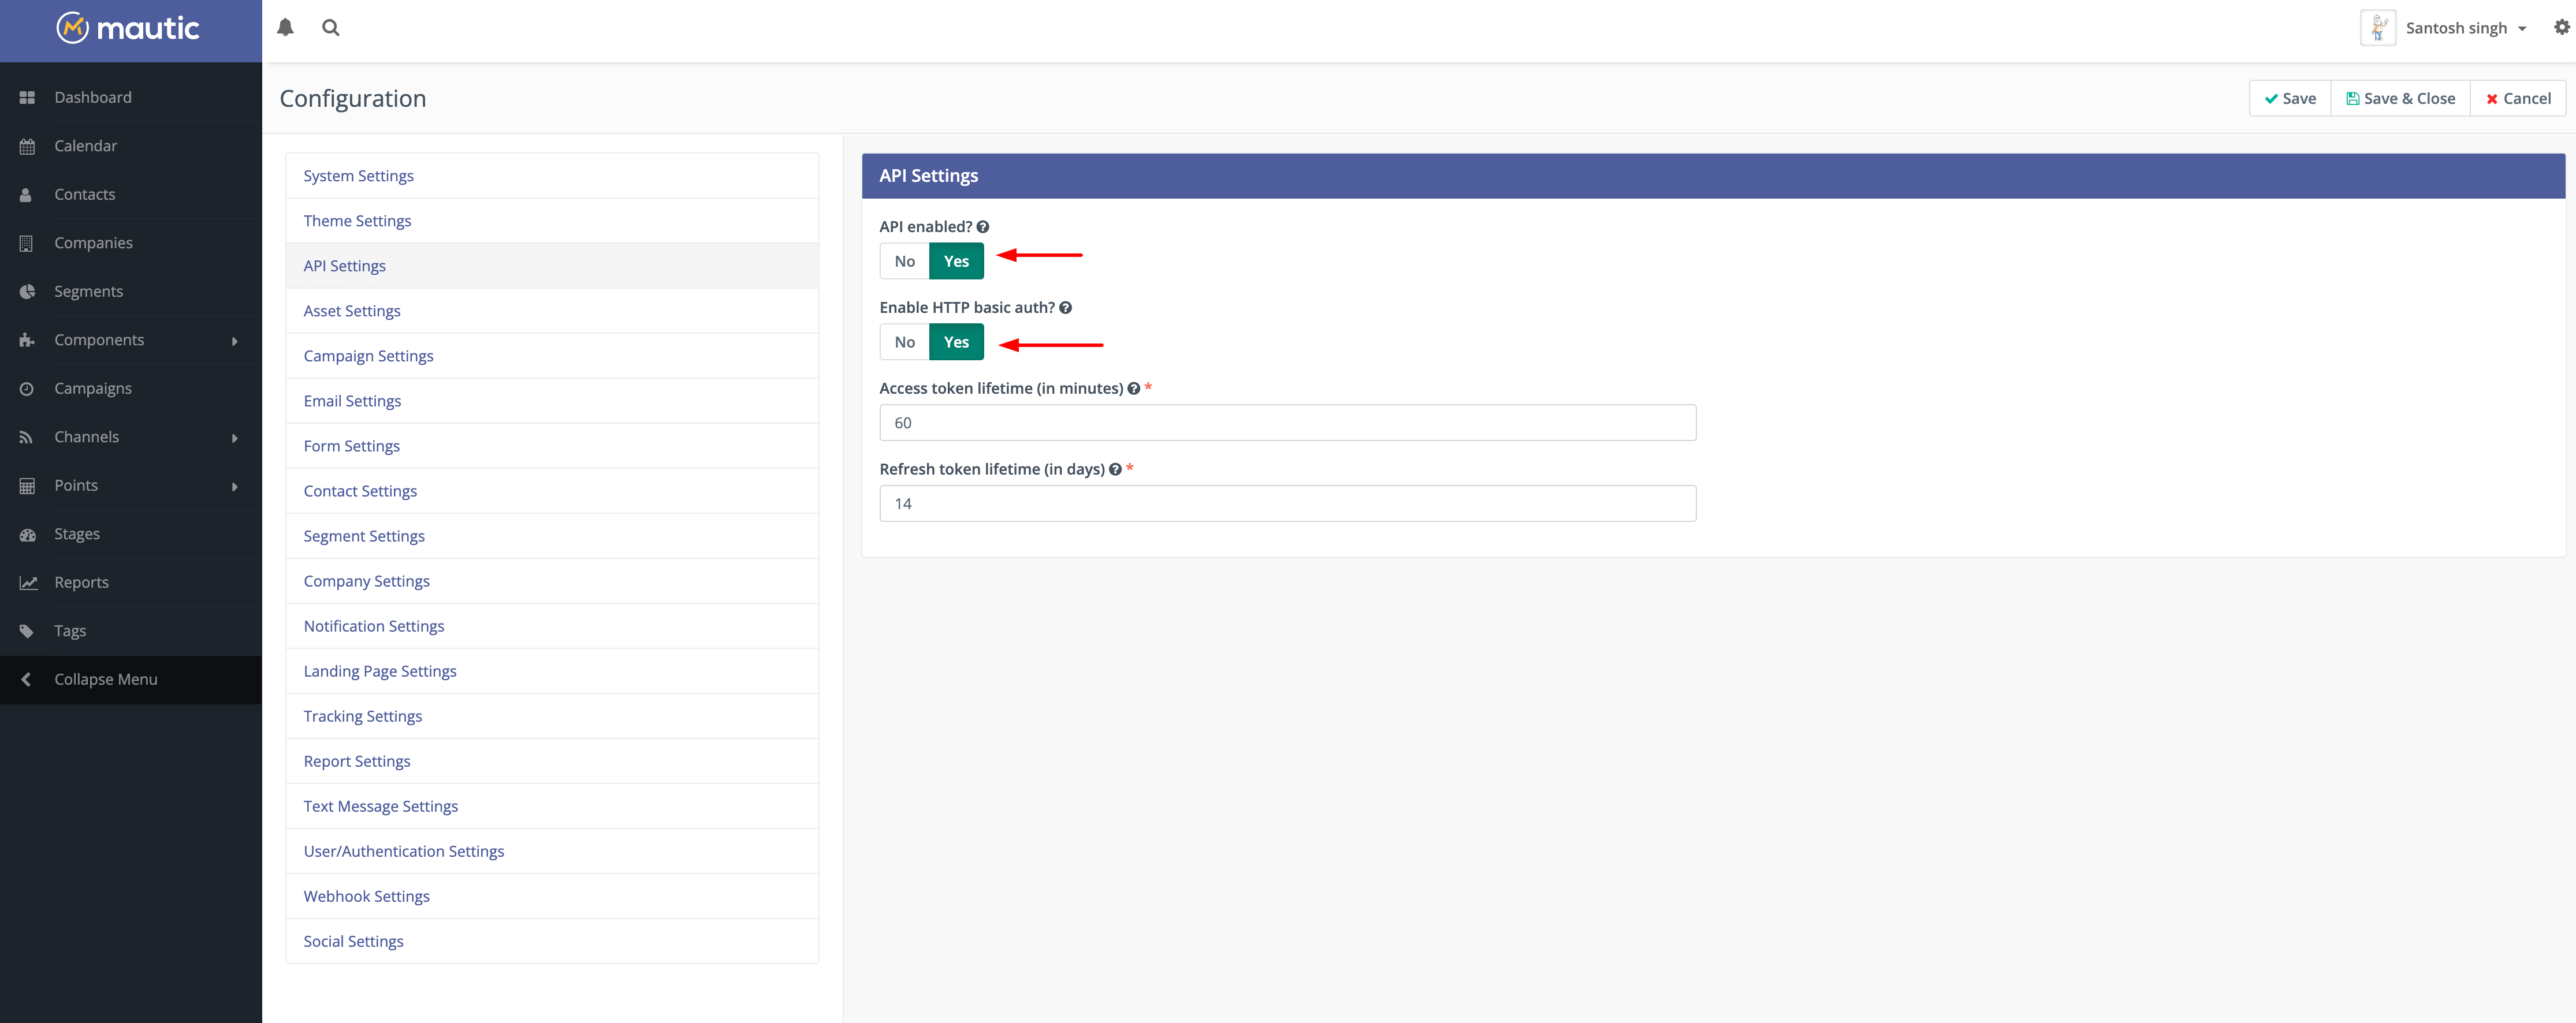
In order to create API Credentials, now you need to visit https://yourdomain.com/mautic/s/credentials/new
and under redirect URI, you need to put https://yourdomain.com/wp-admin/edit.php?page=wpdigipro-autoresponder-mautic-settings if your WPDigiPro is installed at https://yourdomain.com.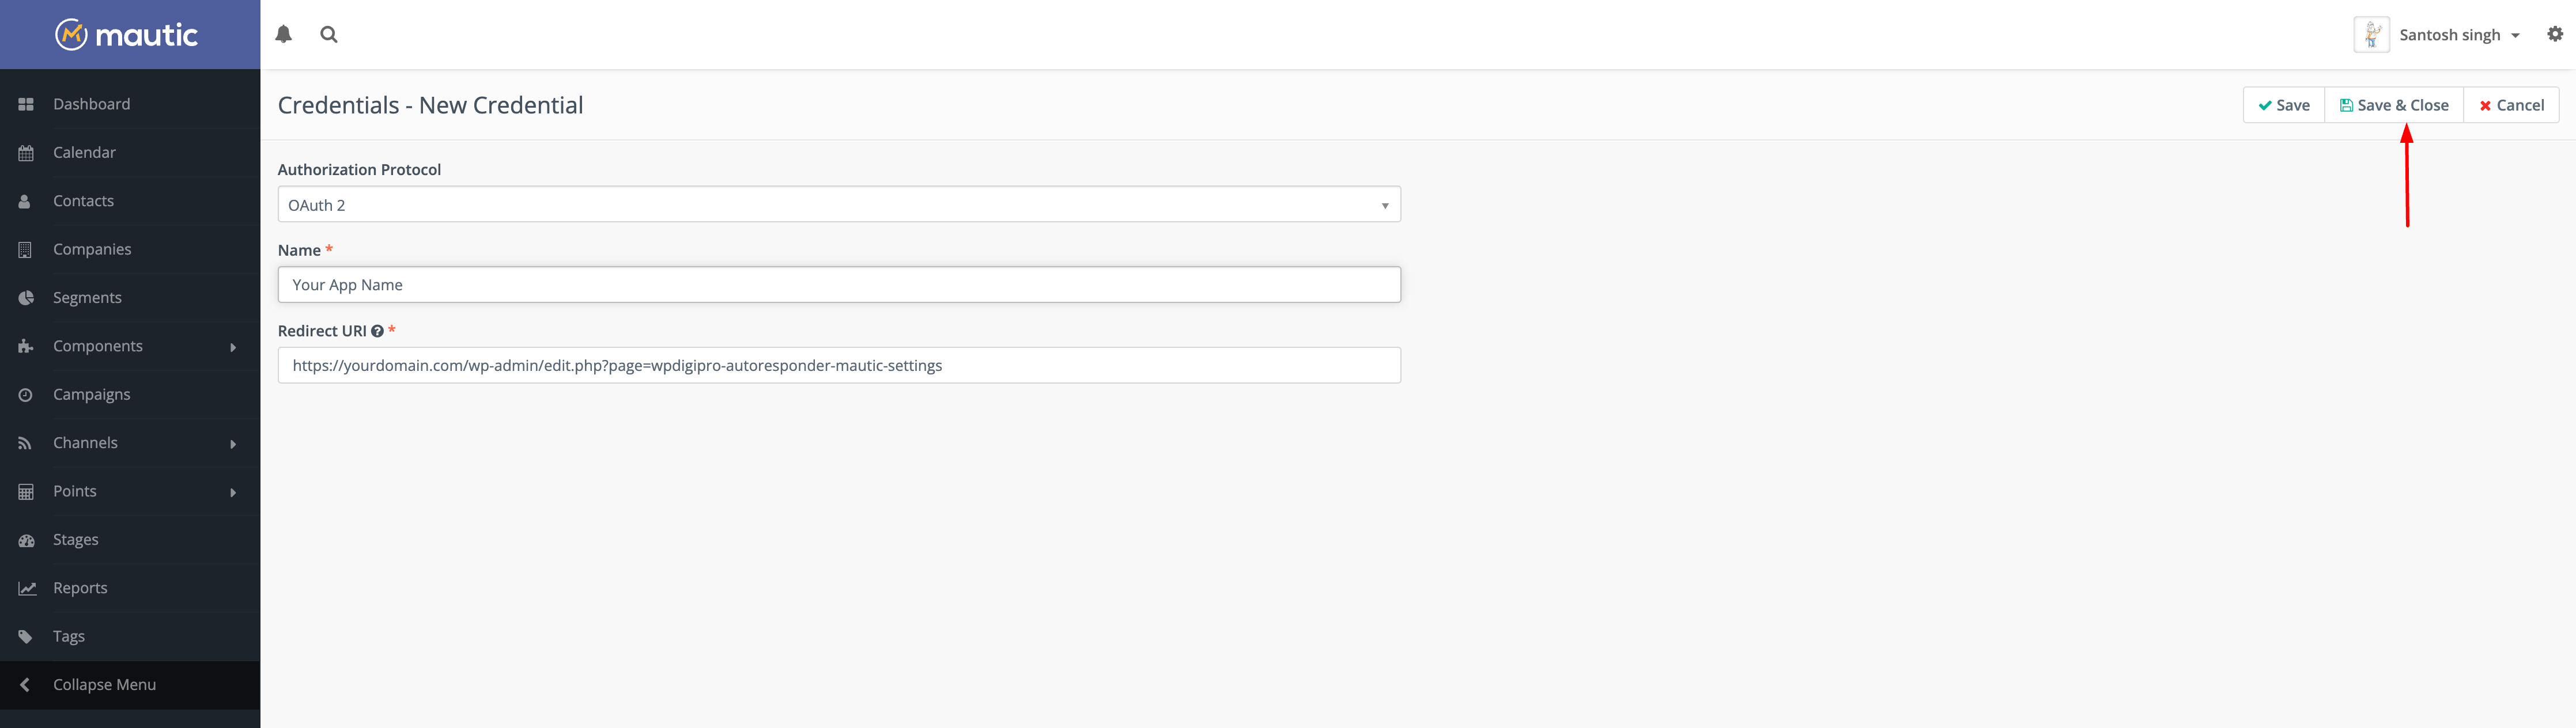 After clicking on "Save and Close" button, you will get your "Public Key" and "Secret Key" on the next screen as shown below:
Sendinblue
If you don't have an account, you can create your Sendinblue account.
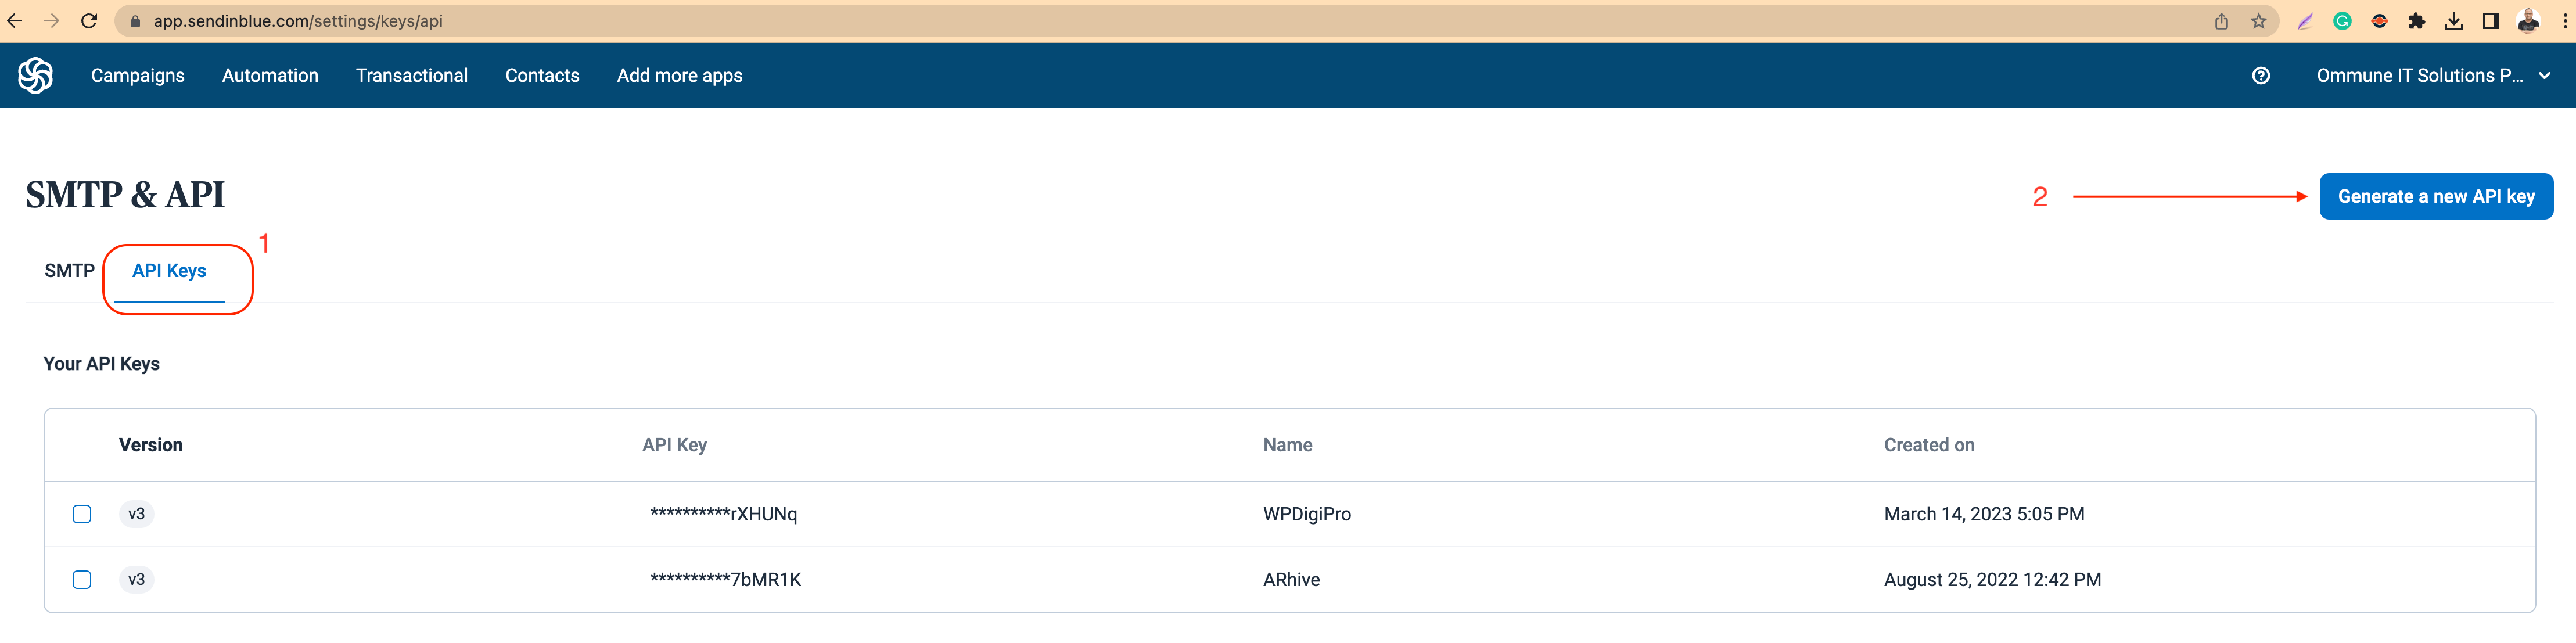
If you already have an account, you can visit https://app.sendinblue.com/settings/keys/api page to access/generate a new API Key.
OR
To get your API Key Check down arrow icon in extreme right hand side under your company name as shown below.
 Then click on "API Keys" tab and then click on "Generate a new API Key" button as shown below:
How to lock pages for non-buyers access?
Go to Dashboard > Pages > Edit any page.
You’ll find below two additional options on your right side of the page.
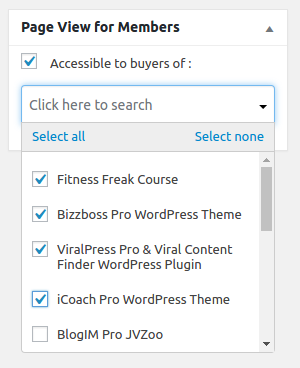
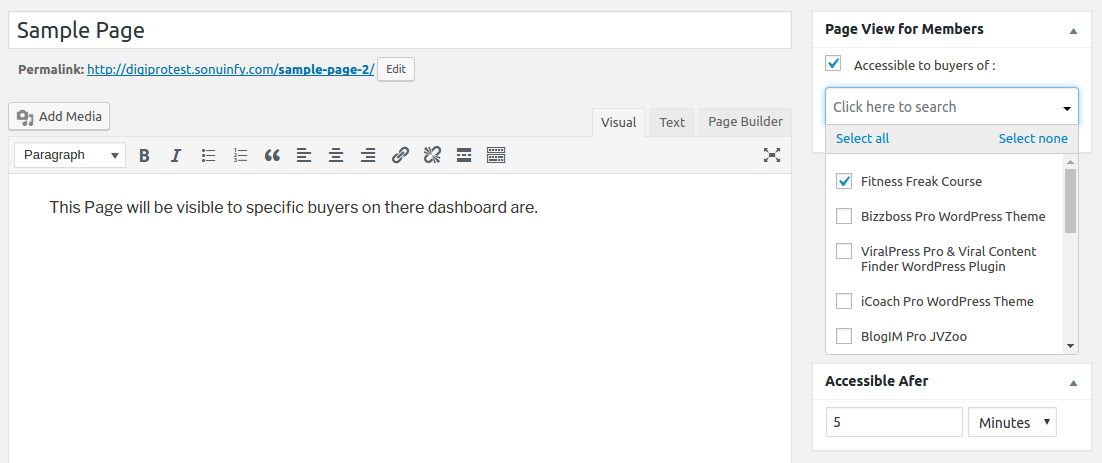
Page View for Members
This option allows you to show a particular page to the buyers of selected products only. Rest of the buyers who has not purchased the selected product will not have access to this page.
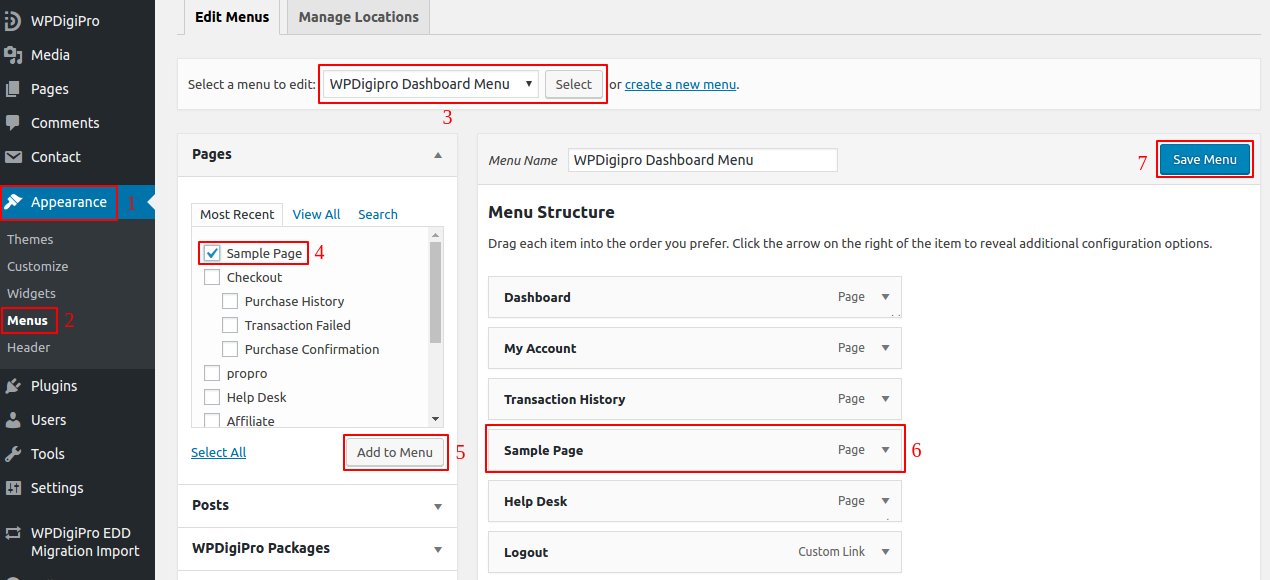
Once the product is assigned. Go to MENUS and assign this page to the WPDigiPro Dashboard Menu.
Go to Dashboard > Appearance > Menu > Edit WPDigiPro Dashboard Menu.
Check the Most Recent tab on your left screen, the page that you have recently edited/added will be listed here. Add that page to Menu and click on Save Menu button. Now, this page will be visible to the buyer after specific time only.
Edit Page
Dashboard View

How to setup subscription/recurring based product?
Go to your admin dashboard and click on “Add New” Menu link under “WPDigiPro” menu as shown below:
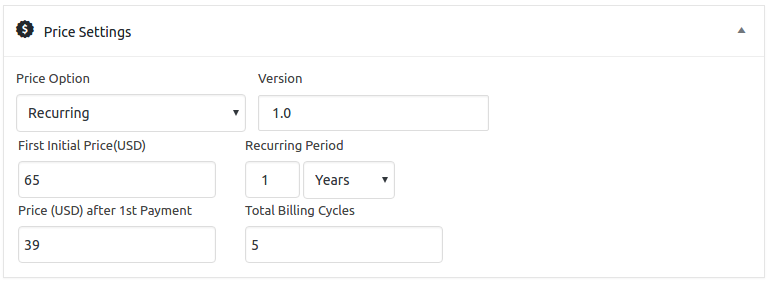
You can set the product price to One Time Payment, Recurring Payment, Adaptive Payment or Preapproved Payment from Price Option under Price Settings. Here select Recurring as shown in the below screenshot.
-- You can assign First Initial Price, Recurring period for years, months, weeks and for days.
-- Under Price after 1st Payment option, set up the price which a buyer should be charged in his/her second period.
-- Based on the above example Total Billing Cycles indicates that the buyer can maximum pay up to 5 cycles only. Once the billing cycle is over, access to this product will be revoked from buyers dashboard.
Make sure after configuring the entire product page. The product BUY NOW link is linked with the actual BUY NOW link of your sales page.
Note:
-- Recurring payment works with PayPal only. So, make sure you are using PayPal payment gateway.
-- Just in case if the buyer cancel the recurring payment from his PayPal account, then the access to his purchased product will be disabled from his/her dashboard area.
How can I add buy now links and protect 1 specific page using WPDigiPro?
Assuming you already have a product and sales page before using WPDigiPro. Check the below guide on how you can save your time by not creating another sales page.
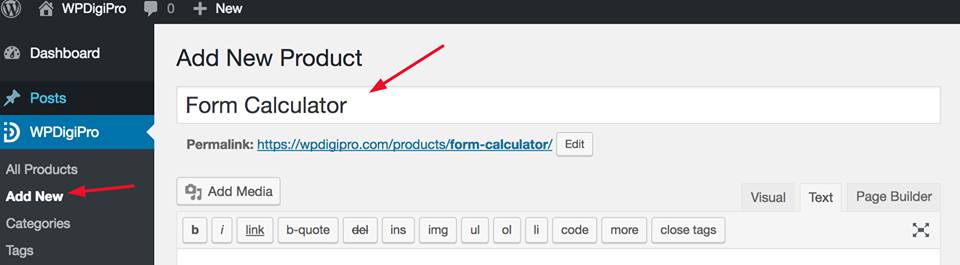
Step 1 - Go to your admin dashboard and click on “Add New” Menu link under “WPDigiPro” menu as shown below:
-- Scroll down and add price of your FORM calculator(Product) in “Price Settings” as shown below:

-- Hit the Publish button, once you have added the price and made the changes as needed.
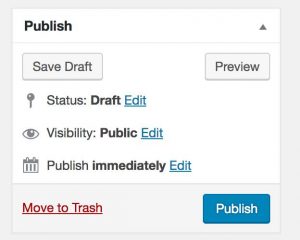
-- After this, page will reload and you will see a BUY NOW link as shown below.
Step 2 - Now COPY THIS LINK and LINK it TO YOUR SALES page’s BUY NOW Button and check the last step carefully.
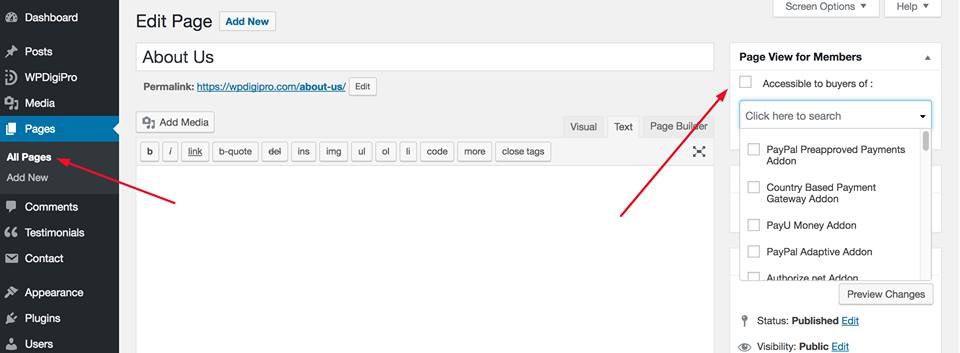
Step 3 - Go and click on EDIT PAGE of any of your pages, which you want to be accessible by the buyers of the product which you have created above. On the right corner of the page you’ll see PAGE VIEW FOR MEMBERS sections as shown below. Here, just select the product which we have just created. Do not forget to check “Accessible to buyers of” checkbox and UPDATE the page.
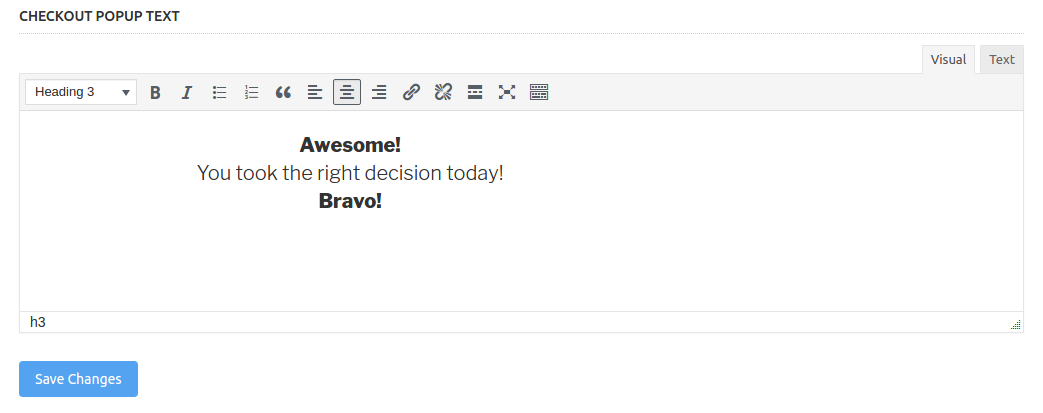
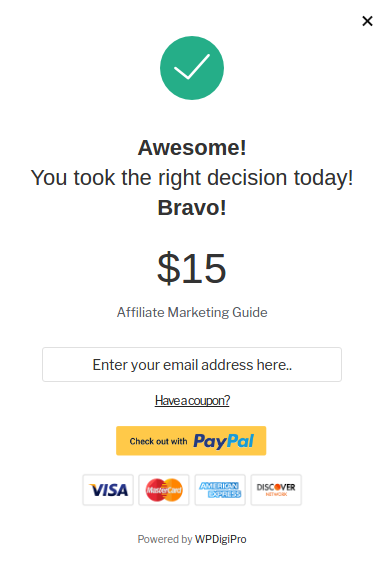
How to change text in payment popup?
Go to WPDigiPro > Settings > Others > Checkout Popup Text.
Here enter the text as per your requirements and when done, click on save changes.
How to add custom currency?
Note: Before adding a custom currency make sure it’s supported by the payment gateways.
Let’s assume your currency is not listed in WPDigiPro.
Go to WPDigiPro > Settings > Others > Currency Settings. Click on the add icon and a popup will appear where you have to add the required details.

Click on Search More Currencies and it’ll redirect you to a page where all the currencies will be listed. Once all the details have been added click on Submit button.
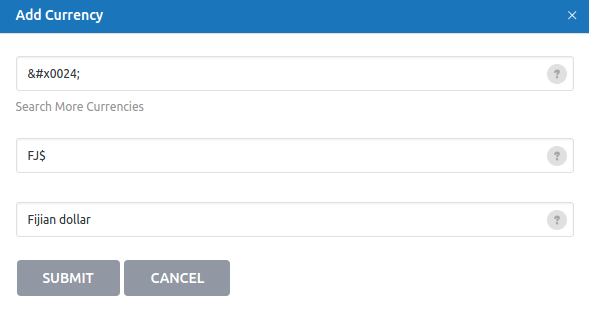
Once the currency is successfully added. Select the same in currency settings and click on Save Changes button. Now, this newly added currency will be applicable across WPDigiPro.

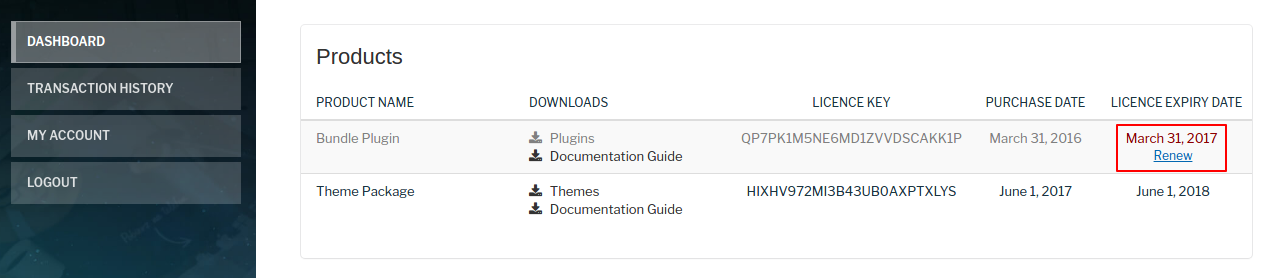
How can a buyer renew his product license?
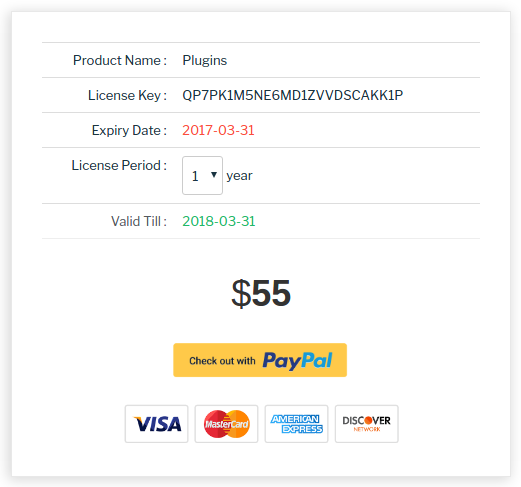
Buyer can renew his license from his dashboard. Those products which are expired will be faded and there will be a Renew link below the license expiry date column as shown below. User can click on the Renew link and it’ll redirect them to a renewal page, where he can fill up the payment details and renew his license as shown below.